29 March 2021

Progress Review: Orb of Zot

    I have settled on a 2d circular shape for the game controller to represent the orb of zot. The orb is the ultimate end goal in the video game and I thought it was fitting contextually. It operates by turning the player's facing using the potentiometer. After that the light sensor will determine the facing of the player and if it is uncovered and receiving light the player will begin moving that direction. You will notice I took out the "attack" function from my previous builds as the have added an auto attack function since I last played.


There are a lot of things that you can do in this game that you almost need a keyboard however, this is the basic gameplay of the game. Do you believe that there should be more added or this is enough to have an enjoyable experience? If so, would access to the "quick bar" inventory be a good option?

Sketch:


Schematic:


Pseudo Code:

#include <Adafruit_CircuitPlayground.h>
#include <Adafruit_Circuit_Playground.h>

//"Orb of Zod" game controller code
//Code by Grant Gillian, Spring 2021

//define light sensor
//define potentiometer pin

//set values for wsad positions on potentiometer

void setup() {
  // put your setup code here, to run once:

  Serial.begin(9600);
  delay(1000);
  CircuitPlayground.begin();

}

void loop() {
  // put your main code here, to run repeatedly:

  //call potentiometer function to determine direction player is facing
    //while loop to call movement function
    //while light sensor is recieving light move forward
    //else = nothing/don't move
}

//potentiometer function 


28 March 2021

Helltaker Game Controller - Progress Review

 To open up this post, I am in no way intending anything malicious and sincerely apologize if you may find the content of this post disturbing as it relates to demonic culture, entities, etc... with a pentagram. The game I selected is Helltaker, a game where you traverse into hell to acquire a harem of demons. The game is explicit in no way, and it is quite cartoon-y in its art direction. Going down to mechanics, game-play consists of puzzles that you, the Helltaker have to overcome by reaching your goal in a set amount of steps. Simple in concept and quite challenging upon play. The music is one of the biggest features of this game, and I initially wanted to incorporate more beat-based motions into a controller, but that wouldn't work well if you had to be meticulous and plan out your steps.

The controller will be a cylindrical box, with the top holding a pentagram design, each point of the star will be a movement option except for one, which will have functions pertaining to interacting in the game. The arrows will work via a conductive material painted red. I'm still learning to code it, but it would be either with a charged alligator clip or simply your finger. In the center of the pentagram will be the circuit, glowing red to accompany the game's theme. Within the box will be the wiring and any more machinery that I may add as the project continues.

Questions:

Is there anything I should add to the controller to give feedback?
What would you change about its design?


Psuedocode:

void setup ()
{

//setting up anything that need setting up

}

void loop() 
{
//main code that runs repeatedly

//checking for button presses (possibly can be expanded to give feedback)
//lighting pattern and sequence for the CPE as it is used would also go here

//code here would be directly translates button presses to movement within the game
}

void Press
{
//If player presses button, a thing happens
}


Vecter Controller: Progress Review

 My controller for Vecter turns the player’s hand into the hovercraft. You can gesture the various movement options with your hand to directly control the vehicle. I’ve primarily utilized the CPE’s accelerometer to detect the x and y axis of your hand and mapped various tilting gestures to the correlating vehicle inputs. Tilting left or right make the vehicle strafe left or right. In Vecter, rarely do you want to stop accelerating, so I’ve decided to make it toggle upon tilting forward for the first time, which only toggles off when tilting back to brake. Tilting forward while already accelerating will activate a boost. This allows you to keep your hand in a more comfortable position while still playing the game optimally.

While the player can shoot endlessly, it will subtract from your score so I want its input to be very clear. My idea is to attach a contact to the fingers and the palm, so that making a fist fires your weapon. Or alternatively, just the index finger and thumb.


That where my first question comes in. Is a contact switch too simple? Shooting is the only input that I feel shouldn’t be on the accelerometer, but I struggled to come up with an alternative that I was satisfied with.


Secondly, could this design benefit from moving the shooting(or other) input to another hand? After testing my code, I feel comfortable having all the input be on one hand. However, once I get to designing a custom, 3D-printed, housing I fear weight will become an issue.


The code below is partially functional (uses CPE only) as I really wanted to test my ideas before committing to one. Feel free to test it yourself (Serial Monitor must be open): 


/* * Custom Controller Pseudo Code * Gyro Band - Cameron Friday */ #include <Keyboard.h> #include <Adafruit_CircuitPlayground.h> #include <Adafruit_Circuit_Playground.h> //shooting control pin //boolean for shooting/set void setup() { // put your setup code here, to run once: //Initialize CPE and Keyboard output Serial.begin(9600); while(!Serial); CircuitPlayground.begin(); Keyboard.begin(); //read shooting pin //set shooting bool according to switch's starting state } void loop() { // put your main code here, to run repeatedly: //read accelerometer x and y float x = CircuitPlayground.motionX(); float y = CircuitPlayground.motionY(); Serial.print(x); Serial.print("\t"); Serial.println(y); //read shooting pin //set shooting bool accordinlgy ////GYRO CONTROLS BELOW//// //Strafe Right// if(x <= -4) { Keyboard.press('d'); //light up right side Neopixels } //Strafe Left// if(x >= 4) { Keyboard.press('a'); //light up left side Neopixels } //Brake if tilting backwards// if (y >= 4) { Keyboard.press('s'); //toggle off acceleration Keyboard.release('w'); } //toggle off acceleration //light up rear Neopixels, red //Boost ONCE if tilting forward// if (y <= -4) { //toggle on acceleration Keyboard.press('w'); //Boost Neopixel animation, only if it doesn't interrupt other processes } //Neutral X Axis// if ((x > -4) && (x < 4)) { Keyboard.release('d'); Keyboard.release('a'); //all Neopixels dimly lit } //Neutral Y Axis// if ((y > -4) && (y < 4)) { Keyboard.release('s'); } }

Game Controller Castlevania - Progress Review

My controller is a potion bottle, themed after the holy water from the game Castlevania. In the game, holy water is a very useful item and can be used to easily defeat the bosses. It would operate by tilting the bottle left, right, forward, or backward to move (reflected as a,d,w, and s respectively), shaking the bottle to pause the game, corking the bottle to jump, and shouting to attack. I might switch the attack and jump binds only because you need to attack a lot in the game and I feel like you would not want to continuously shout over and over again.


PSEUDOCODE

void setup() {

  // put your setup code here, to run once:

  //initialize variables

  //initialize pin that breadboard is attached to

  //initialize accelerometer

  //initialize sound sensor

}


void loop() {

  // put your main code here, to run repeatedly:

  //use mg to check tilt forward, backward, left, right (accel)

  //if tilt forward, keyboard w

  //if tilt backward keyboard s

  //if tilt left keyboard a 

  //if tilt right keyboard d

  //check for shake (accel)

  //if shake keyboard (emulator start key, default is I

  //check audio level (sound sensor)

  //if audio level = shouting threshold (TBD), then keyboard attack key (default k)

  //check input on breadboard pin

  //if yes, keyboard jump (default j)

}


Questions:
1. How can I house/attach the breadboard and CPE and still be aesthetically pleasing?
2. Should I have the cork be attack or jump? (Whatever isn't bound to the cork will be bound to shouting.


Scaffolding: Progress

 The game controller I have designed is made to work with the rhythm game "Friday Night Funkin". I will be using all of the accelerometer's angles to input each of the keyboard's arrow keys, I will also use a potentiometer to raise and lower the music's volume, and a light sensor that will detect when it is dark (aka when you have your finger over it) that corresponds to the escape key on the keyboard, which allows the player to go back in the menu of the game. The design is just a box with some of the game's characters on the side and the abbreviation of the game on another side. On the top of the box is where all the controls will go and I will paint the arrows as their respective color in the game for aesthetics. I will also put  "-" and "+" symbols next to the potentiometer that will let the player know to twist it to the left for lower volume or right for higher volume.


void setup() {
  // put your setup code here, to run once:
  
}

void loop() {
  // put your main code here, to run repeatedly:

  //Get values of accelerometer, assign each value to each arrow key on the keyboard
  //Get value of potentiometer to see if it is being twisted left or right, if it is being twisted left input "-" on the keyboard and hold it, if being twisted right input "+" 
  //Get value of light senor, if light value is darker than a certain value, input "esc" on the keyboard.


}


Questions:

1. Is there any other sort of inputs that I can use to make hitting the arrow keys easier?
2. should I make my design smaller?


Progress Review Superflight


                My controller that I will be building will be compatible with the game Superflight. A game where you play has a man who has a wingsuit. The game has super simple mechanics, but it uses them very well. There is no real objective but to glide through the never-ending land of spires, valleys, tunnels, and pits, throughout a beautiful land that is out of this world. The controller is inspired not from a wingsuit like the game but from a traditional glider. There are not many controls for the game itself. They are W, A, S, D, and that is all. The Circuit Playground Express will be attached in the middle of a long pole. The user will grab the two opposite sides of the pole and hole it horizontally. The code will utilize the Accelerometer in the Circuit Playground Express. With a downward motion of the hand,
the controller will press W, and an Upward motion will cause it to press S. The same objective with the right and left, or D, and A, but I do not want to make it to the same degree as the S and W. I would like it to be less and try to make the experience a bit less jarring to someone in In real life.

Does my Pseudo code look logical?

Is there anything I could add to positively increase user experience?


Pseudo Code

//Variables

//Keyboard mapping

//loop

//Rolling the bar to the Right or left will control A and D

//increasing or decreasing the pitch of the bar will control W and S.

Progress Review: Controller for Art of Rally

 For this project, I was told my ideas for controllers were fine. but they didn't seem to connect too well to the conceptually, so I went back to the drawing board. I decided to look at the game another way: originally, I was going to create a controller that simulated some aspect of real-life rally racing, but then I decided to look at it in the way of toy cars all racing on a course. On that line of thinking, I was remembering all the RC cars I used to play with when I was a kid, that worked on radio controllers and had sticks for turning and steering. Usually, you would need both hands for the controller, but what if you only had to use the one? I decided on making a controller that used the accelerometer for turning and a knob attached to a potentiometer to control acceleration and braking. I may switch this around in the future depending on how intuitive this setup is, but I'm hoping this becomes the best motion-controlled, one-handed toy rally car controller.

Pseudo Code

// Load CPE library files
if (motionSensor is tilting left)
{
    press A;
}

if (motionSensor is tilting right)
{
    press D;
}

pot = analogRead(A1);

// 512 is half of 1024,  turning to the left brakes, turning to the right accelerates

if (pot < 512)
{
    press S;
}
else if (pot > 512)
{
    press W;
}

Video

Controller Sketch

Schematic

Questions:

1. Is using the accelerometer for turning and the potentiometer for acceleration intuitive enough as is? Or should I switch it around?

2. Is this controller in general more intuitive than the other controllers I wrote about for the blog post (found here) or is it not? Why or why not?

Progress Review: Pepsi Can

In this project, I’m using a Pepsi can to control a game called soda man, which features a Pepsi colored man running around a neighborhood collecting as many cans as he can while dodging many different obstacles in his path. After all, if you’re going to play a Pepsi themed game, it might as well have a Pepsi themed controller to go with it.


How this controller works is that it’ll use the sound sensor and accelerometer as a replacement for the control keys and spacebar. While running, you tilt the can left and right to move accordingly, tilting it up to jump and tilting it down to slide. Once you acquire enough cans to boost, you can scream near the can. Once the sound sensor hits a certain threshold, it’ll activate the boost.


#include <Adafruit_CircuitPlayground.h>
#include <Adafruit_Circuit_Playground.h>
 
//Variables for accelerometer
//Variables for sound sensor
 
void setup() {
// put your setup code here, to run once:
  CircuitPlayground.begin();
}

void loop() {
     //accelerometer setup
      float x = CircuitPlayground.motionX();
      float y = CircuitPlayground.motionY();

      //correction of the accelerometer

      //if Y hits a certain threshold, activate up button
      //else Y hits a certain threshold, activate down button

      //move left or right depending on X's float

      //if sound sensor hits a certain threshold, activate boost
}


Questions:

1.)  The can honestly might be a bit too small for the components going inside of it. If that’s the case, what alternative method of storing it would you suggest? A litter bottle seems too big and a smaller bottle seems rather lopsided.

2.)    Do you think the sound sensor could be replaced with something more efficient? I like the idea of screaming loudly while playing this but if it’s in a can it might not register as efficiently as it would with a different method.

Marble Ball Controller: Progress


This controllers main controls are the involve forward and back to move simulate the forward and back movement respectively. The ball is bonded to the center to the poles going through the ball. This allows me to bind inputs when shifting the ball left or right. For the game that we are playing we will need this slide input to simulate jumping. Moving left and right will be done via left and right tilting of the controller. The CPE visible to the user will have the neopixel LEDs light up based on the rotation to help provide feedback to the controllers movement.    


    check if current rotation is increasing 
    if true output forward movement

    check if current rotation is decreasing 
    if true output backwards

    check if controller is tilting to the left
    if true output left
    light cpe pixels a certain color

    check if controller is tilting to the right
    if true output right
    light cpe pixels a certain color

    check if soft pot pressure is on a threshold
    if true simulate jump input


Test
Resistors presented include the soft pot and the rotary encoder 


Thoughts on the input mapping for the controller? What should be improved/you're recommendations on how input should be? Placement for the rotary encoder to read rotation is still up in the air at the moment, suggestion on how you would get something like this to behavior appropriately?


Progress Review - Game Controller

Game: Root Beer Tapper

https://archive.org/details/arcade_rbtapper 


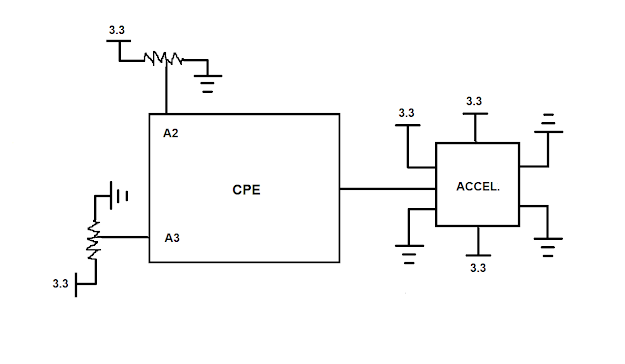
I decided to go with my first controller concept since it was the most developed out of my other ideas. Conceptually, I took inspiration from "arcade-style" controllers that could be bought for home consoles, since Root Beer Tapper is an arcade game. Additionally, my controller will also have a physical tap that will be used to fill mugs in-game. The inside mechanics feature a CPE that is suspended with rubber bands, two potentiometers, and string attached to the tap and a rubber band. Each potentiometer will control a direction that the bartender moves; one will control his vertical movement while the other will control his horizontal movement. When the tap is flipped down, a string will pull one of the rubber bands to tilt the CPE on the x-axis. If the CPE is tilted, the mug will fill, and the player must lift the tap again to release the CPE and toss the mug once it is full. The potentiometers will be capped with knobs to make them more user-friendly, and the box will be labeled and decorated to match the aesthetics of the game.


//Libraries

#include <Adafruit_CircuitPlayground.h>

#include <Adafruit_Circuit_Playground.h>

#include <Keyboard.h>


//Code by Paulina Weintraub 2021


//Variables

int moveVert = 1;

int moveHor = 1;


void setup() {

  // put your setup code here, to run once:


  Serial.begin(9600);

  delay(1000);

  CircuitPlayground.begin();

}


void loop() {

  // put your main code here, to run repeatedly:


  //Receive analog values from the accelerometer

  float x = CircuitPlayground.motionX();


  //The value r which is from 0 to 255, mapped to the value x, which is from -10 to 10

  int r = map(x, -10, 10, 0, 255);


  //Potentiometer input

  moveVert = analogRead(A2);

  moveHor = analogRead(A3);


  //Potentiometer mapping

  moveVert = map(moveVert, 1, 1024, 1, 255);

  moveHor = map(moveHor, 1, 1024, 1, 255);


  //Potentiometer 1

  //If turned to the left, move tapper left (hold left arrow key)

  //If turned to the right, move tapper right (hold right arrow key)


  //Potentiometer 2

  //If turned to the right, move tapper down one space (tap down arrow key)

  //If turned to the left, move tapper up one space (tap up arrow key)

  //There will be a zone where the player can turn the potentiometer back to "release" the key


  //Tilting on the x-axis

  //Tapper must be standing against the tap 

  //While the CPE is tiled to the right, begin filling a mug (hold left ctrl)

  //Release to send mug to customer

  //If released too early, mug won't be full


}


For my peers: Is there a way I could make the knobs to be more thematic? Would the rubber bands be too flimsy? If so, is there a better way to achieve the tilt function I described? 

Progress Review: Thumper Space Beetle

  1. Thumper is a self-proclaimed “rhythm violence game”; it features a single character, the so-called space beetle, traversing a track and focuses on timing player actions to the music and queues in the environment. Options include speeding up to break through barriers, jumping to activate glowing platforms or fly over obstacles, and leaning either left or right to slide off of barriers that appear when the path comes to a turn. My controller focuses on that visceral aspect of the game by recreating the space beetle and allowing the player to mimic its ingame motions. Rotating the beetle left or right with the X accelerometer leans the character while squeezing the wings down allows them to gain speed or jump. Angling the beetle down on the Y accelerometer allows them to open their wings and turning it up slows them down.


  1. Video


  1. Pseudo Code

//////////////////////////////////////////

//  Instructions:                //

//  W = Rotate Down       //

//  A = Rotate Left           //

//  S = Rotate Up            //

//  D = Rotate Right        //

//  Space = Left Wing     //

//  Space = Right Wing   //

/////////////////////////////////////////


///////////////////////

//  Variables  //

///////////////////////

// Create turn int


///////////////////////////////

//  Keyboard Map  //

///////////////////////////////


// Loop


// Accelerometer X

// Map X to turn

// If equals -1 

// Keyboard write 'A'

// If equals 1

// Keyboard write 'D'


// Accelerometer Y

// Map Y to speed

// If equals -1

// Keyboard write 'W'

// If equals 1

// Keyboard write 'S'


// Force Resistor 1 or 2 Read High

// Keyboard write 'Space'


  1. Questions

Does including wings to press into the force sensitive resistors seem too complex?

Does the control scheme make sense?