19 April 2022

House Pusher (an HTML game) - Project Controller


Video: https://www.youtube.com/watch?v=0dxKIgr2ULo

I had to change my game multiple times since I ran into some technical issues (like ordering the wrong potentiometer, the photoresistor not working as planned, etc.) but then I decided last minute to settle with an HTML game that I found online called “House Pusher”. Its concept is from a puzzle video game genre called Sokoban in “which the player pushes crates or boxes around in a warehouse, trying to get them to storage locations” (Wikipedia.org).

It’s a simple puzzle game with multiple levels that only has 4 input controls (arrow keys: left, right, up, down) and the “r” button to restart the game. The main objective is to push tables onto a marked white spot in no specific order and after you put all the boxes in their appropriate spaces, the room becomes furnished, and you can then move on to the next level. I used the 
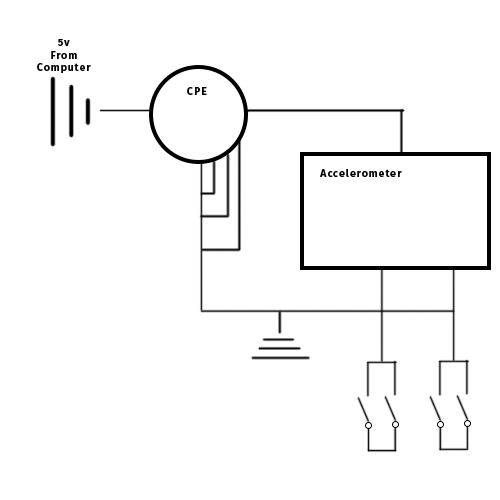
accelerometer to move the character so the character can therefore move along the grid via pushing the controller in any direction along the x or y-axis. I then decided to use the shake feature inside the Bluefruit which allows the player to restart the level.

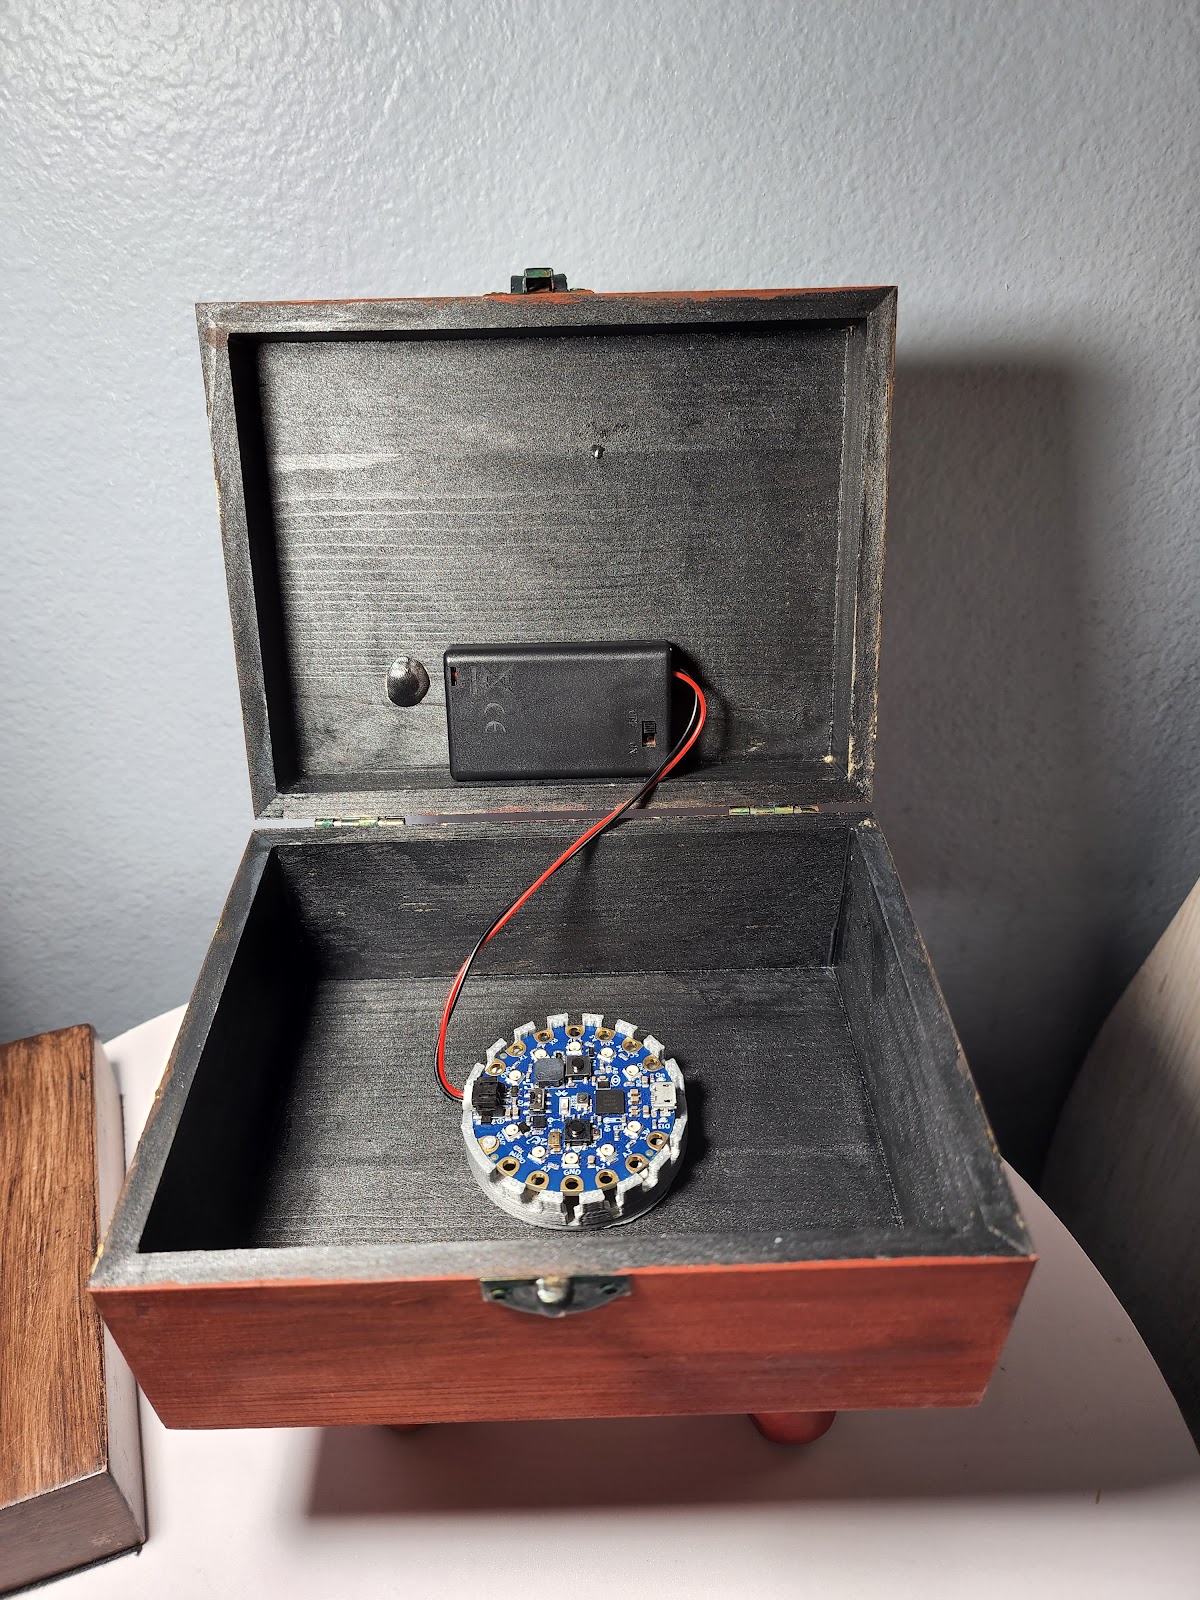
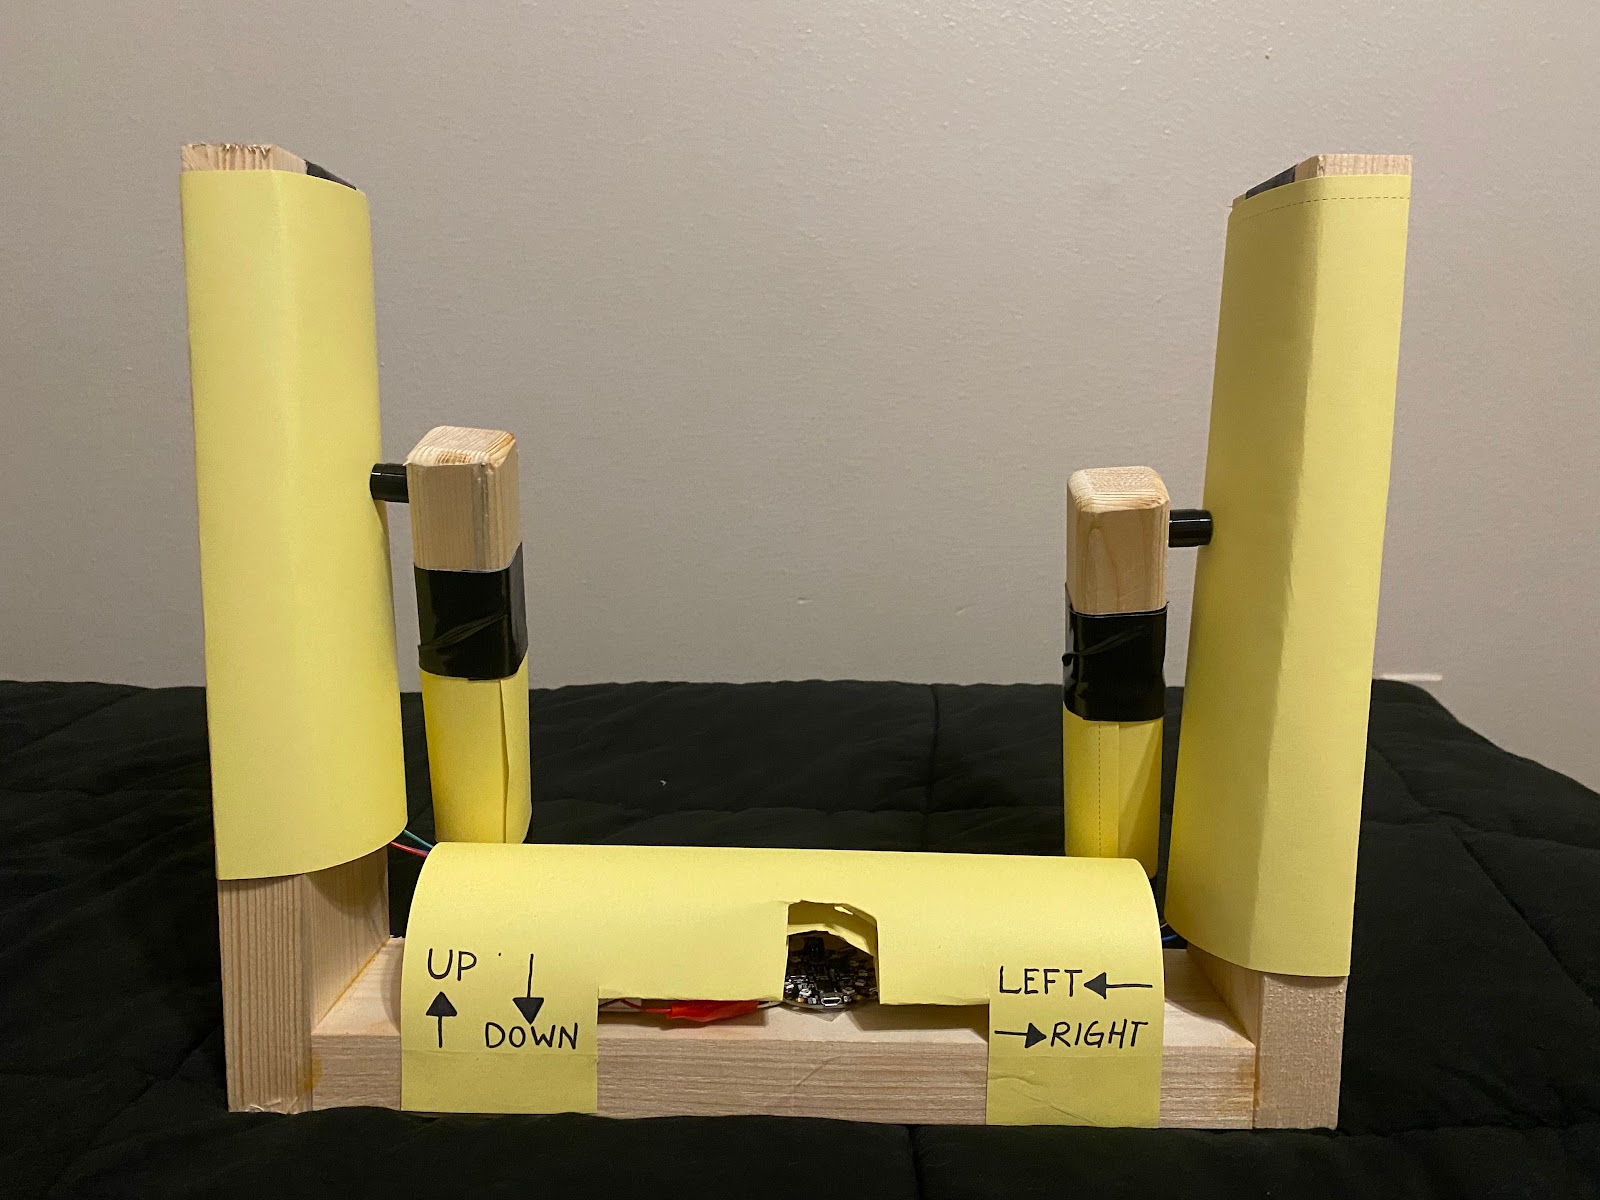
I did not differentiate far from my original concept; I designed my controller to look like a table because of the game's basic theme; I also wanted to add some flair to it by adding a vase on top. I made the legs and vase out of polymer clay and then painted the box and clay parts with acrylic paint. To me, it looks more like an art piece than a controller, but it works when considering the setting of this game. Since the controller is essentially a box, with the CPB inside, I decided to make it Bluetooth for easier gameplay and then painted some signifying symbols so that any user that picks up the controller can have a general idea of how to use it. I wanted a way for the user to turn the controller on and off externally rather than having to open the box, but alas, I don’t have the proper tools to cut a small hole for the battery pack to be glued to the outside. But I think it works better visually to be hidden away and I believe most people would be curious enough to see if the front latch opens so they can see what rests inside; so I decided adding another symbol to display that would be futile.

My code is very simple. My threshold for the x and y-axis is 5 and -5 so the controls aren’t too sensitive nor too physically demanding on the user. I added a 500-millisecond delay so the character can move slow enough without racing across the screen and messing up the player’s progress. The shake threshold is at 20; I chose this number because I wanted to make sure the user doesn’t have to shake too hard or worry about their slight movements triggering the restart button. 

Question: If this game had 8 inputs (arrows, buttons c, x, z, and spacebar) like my previous game, how would you personally set this up on a CPB/CPE for efficient user usability? 

#include <Adafruit_CircuitPlayground.h>
#include <Adafruit_Circuit_Playground.h>
#include <bluefruit.h>

BLEDis bledis;
BLEHidAdafruit blehid;

//Initiate variables for shake threshold and accelerometer
int shakeThresh = 20;
float x, y, z;

void setup() {
// put your setup code here, to run once:
Bluefruit.begin();
Bluefruit.setTxPower(4);
bledis.setManufacturer("Adafruit Industries");
bledis.setModel("Bluefruit Feather 52");
bledis.begin();
//Start HID
blehid.begin();
//Start advertising device function
startAdv();

CircuitPlayground.begin();

}
//other setup

//Setting up slide switch pin
pinMode(CPLAY_SLIDESWITCHPIN, INPUT_PULLUP);

}

void loop() {
// put your main code here, to run repeatedly:

//Start of if statement that runs entire code. If slide switch is switched on and bluetooth is connected, run code.
if(digitalRead(CPLAY_SLIDESWITCHPIN)&& Bluefruit.connected()) {

//Declaring x,y,z to motion sensor
x = CircuitPlayground.motionX();
y = CircuitPlayground.motionY();
z = CircuitPlayground.motionZ();

//If x-axis is below -5, go left once, then release key. Delay then read next motion.
if (x < -5){
 uint8_t keycodes[6] = { HID_KEY_ARROW_LEFT, HID_KEY_NONE , HID_KEY_NONE , HID_KEY_NONE , HID_KEY_NONE , HID_KEY_NONE };
 blehid.keyboardReport( 0 , keycodes );
 blehid.keyRelease();
 delay(500);

}

//If x-axis is above 5, go right once, then release key. Delay then read next motion.
if (x > 5){
 uint8_t keycodes[6] = { HID_KEY_ARROW_RIGHT, HID_KEY_NONE , HID_KEY_NONE , HID_KEY_NONE , HID_KEY_NONE , HID_KEY_NONE };
 blehid.keyboardReport( 0 , keycodes );
 blehid.keyRelease();
 delay(500);

}

//if x-axis is between the ranges of -5 and 5, don't do anything.
else if (x < -5 && x > 5){
blehid.keyRelease();
}

//if y-axis is below -5. press down arrow key, then release. Delay until next motion.
if (y < -5){
 uint8_t keycodes[6] = { HID_KEY_ARROW_DOWN, HID_KEY_NONE , HID_KEY_NONE , HID_KEY_NONE , HID_KEY_NONE , HID_KEY_NONE };
 blehid.keyboardReport( 0 , keycodes );
 blehid.keyRelease();
  delay(500);

}

//if y-axis is above 5, press up arrow key, then release. Delay until next motion.
if (y > 5){
 uint8_t keycodes[6] = { HID_KEY_ARROW_UP, HID_KEY_NONE , HID_KEY_NONE , HID_KEY_NONE , HID_KEY_NONE , HID_KEY_NONE };
 blehid.keyboardReport( 0 , keycodes );
 blehid.keyRelease();
 delay(500);

}

//if y-axis is between the ranges of -5 and 5, don't do anything.
if ( y < -5 && y > 5){
blehid.keyRelease();
}

//declare shake float and then assign the added absolute value of the x, y, and z-axis 
float shake = abs(CircuitPlayground.motionX())
+ abs(CircuitPlayground.motionY())
+ abs(CircuitPlayground.motionZ());

//if shake is above shake threshold (20), then press 'r' key and release.
if(shake > shakeThresh) {
blehid.keyPress('r');
blehid.keyRelease();
    }

  }

}
//End code


void startAdv(void)
{
//Advertising packet

Bluefruit.Advertising.addFlags(BLE_GAP_ADV_FLAGS_LE_ONLY_GENERAL_DISC_MODE);
Bluefruit.Advertising.addTxPower();
Bluefruit.Advertising.addAppearance(BLE_APPEARANCE_HID_KEYBOARD);

//Include BLE HID service

Bluefruit.Advertising.addService(blehid);

//There is enough room for the dev name in the advertising packet
Bluefruit.Advertising.addName();

Bluefruit.Advertising.restartOnDisconnect(true);
Bluefruit.Advertising.setInterval(32, 244);
Bluefruit.Advertising.setFastTimeout(30);
Bluefruit.Advertising.start(0);

}


18 April 2022

Final Project: Pokémon Master


#include <Keyboard.h>
#include <KeyboardLayout.h>
#include <Adafruit_CircuitPlayground.h>
#include <Adafruit_Circuit_Playground.h>
//Code by Kobe Newland

  // Varaibles

const int debounce = 0;
const int thresh = 500;
int light; 

int leftbutton = 200;
int upbutton = 450;
int downbutton = 600;
int rightbutton = 750;

void setup() {
  CircuitPlayground.begin();
  pinMode(leftbutton, INPUT);
  pinMode(upbutton, INPUT);
  pinMode(downbutton, INPUT);
  pinMode(rightbutton, INPUT);
    Serial.begin(9600);
    pinMode(CPLAY_SLIDESWITCHPIN, INPUT_PULLUP);
    Keyboard.begin();

}

void loop() {
  // put your main code here, to run repeatedly:
  //int pot = analog read a2
  // if pot > 0 && pot < 200
  // if pot > 201 && pot < 500
  // if pot > 501 && pot < 800
  // if pot > 801 && pot < 1023

  //Potentiometer
  //If light = true, select once

  //If turned to the north, move north (270-45)

  //If turned to the west, move west

  //If turned to the south, move south

  //If turned to the east, move east
    int potRead  = analogRead(2);

{
    if (potRead >= 0 && potRead <= leftbutton)
  {
    Keyboard.write('a');
  }

  if (potRead > leftbutton && potRead <= upbutton)
  {
    Keyboard.write('w');
  }

  if (potRead > upbutton && potRead <= rightbutton)
  {
    Keyboard.write('s');
  }

  if (potRead > rightbutton && potRead <= downbutton)
  {
    Keyboard.write('d');
  }
}
  float light = CircuitPlayground.lightSensor();

 if(light >= 50 ){            // if there is light
    Keyboard.press('z');     // press the z key to select
    delay(debounce);
  }  else {                  // if there is no light
    Keyboard.release('z');   // release z to stop
  }

    delay(100);

My project consists of a shoebox painted purple and white with red detailing to imitate the master ball in Pokemon. The goal of this project was to make a controller that allows one to consistently head in one direction while playing pokemon to make things like egg hatching and other menial walking based tasks easier. It consists of a circuit board express, potentiometer, and usb cable primarily. Unfortunately I ran into an issue during development where none of my usbs would work and I lacked access to another computer with Arduino, so unfortunately I lack video evidence, but it did work for a time. 

It is made clear that one has to use the knob attached to the front of the device, although exactly how might not be immediately appearent to everyone. Directions are controlled by moving the knob certain degrees, causing the character to walk infinitely in one direction. A light sensor has also been incorporated into the design. By removing the circle at the top of the box marked with an M, the sensor will detect the light in the room one is playing in, causing it to function as if you pressed a. This means that you can actually play the game and select items in battle as opposed to it being purely a novelty controller which you can only move around in. I am quite proud that I did manage to get it to work for a brief period.

Do you have any solutions for my USB issue?

}

Game Controller - The Hanged Man


For the custom controller, I decided to use the game the Hanged Man to try and create an alternative controller. The goal was originally to try and create a controller that would help with handicap accessibilities, so that players who had one hand would be able to play it. I thought to make a controller that was small in design and size, but comfortable. However, I found that to be more challenging that I originally thought, as I did not take into account the wiring and enclosure space as well as the material for the controller and my own capabilities. As I constructed the controller, I had to remake the enclosure to a larger size and cruder construction in the hopes of being able to convey the idea I had. The controller was going the use the accelerometer to sense the tilting of the controller in order to press the arrow keys in order to move about in the game, and I had originally planned to map inputs using light sensors in place of the two buttons needed. However, since I was restricted with the size again, I found the task too difficult for me and decided to use a potentiometer for the button presses, where turning the dial to one side fully would try and represent a button press. However, I was unable to create a proper mapping for the potentiometer to use this in the fashion that I wanted to perfectly. The reason I decided to make the controller in the visage of a tarot card was to pay homage to the title of the game, as well as to immerse the player in the theme of the game in an attempt to be entertaining. 

What do you think could have been done to create a controller with this idea with a larger size in mind, that is, how would you create a controller that would be ergonomic in the hands of a disabled person? what inputs would you use, how would you build it, and where would you place things?


SCHEMATIC: 


 CODE: 

#include <Adafruit_CircuitPlayground.h>
#include <Adafruit_Circuit_Playground.h>
#include<math.h>
#include <Keyboard.h>


//Written by Jeffrey Jourdan

//Global Variables

const int debounce = 100;
const int thresh = 500;
float map(float x, float in_min, float in_max, float out_min, float out_max);


void setup() {
  // put your setup code here, to run once:
  
  
  Serial.begin(9600);

  delay(1000);

  CircuitPlayground.begin();
  
}//end setup

void loop() {
  // put your main code here, to run repeatedly:
  
  //initialize accelerometor
  
  float x = CircuitPlayground.motionX();
  float y = CircuitPlayground.motionY();
  float rad = atan2(y, x);

//check accelerometer readings

  //Serial.print("\t X value: ");
  //Serial.print(x);
  //Serial.print("\t Y value: ");
  //Serial.println(y);


// If statements to write keyboard presses for the arrow keys based on the positions of x and y.

  if(x <= -5)
  {
    Keyboard.press(216);
    delay(debounce);
  }//end if

  else
  {
    Keyboard.release(216);
  }//else if

  if(x >= 5)
  {
    Keyboard.press(215);
    delay(debounce);
  }//end if

  else
  {
    Keyboard.release(215);
  }//end else

  if(y <= -4)
  {
    Keyboard.press(217);
    delay(debounce);
  }//end if

  else
  {
    Keyboard.release(217);
  }//end else


  if(y >= 2)
  {
    Keyboard.press(218);
    delay(debounce);
  }//end if

  else
  {
    Keyboard.release(218);
  }//end else


  // Setting up the potentiometer to write the other buttons needing to play the game.

  //delcare potentiometer
  int potButton = analogRead(A7);
  //if statements for button presses

  if(potButton > 300 && potButton < 400)
  {
    Keyboard.press('Z');
    delay(500);
    Keyboard.release('Z');
  }//end if


  else if(potButton > 400 && potButton < 500)
  {
    Keyboard.press('X');
    delay(500);
    Keyboard.release('X');
  }//end if
  
  Serial.println(analogRead(A7));
  
}//end loop


VIDEO:


For some reason the first fifteen seconds of the video was clipped, but it talked about choosing the Hanged man for the game controller!


My Controller(Kyle Spence)


 For my controller I went with a simple motion control setup for Super Mario Brothers classic. In this game the controls are WASD and with the tilt of the controller the titular character moves to the right or left. If the CPE is moved Up or Down, Mario jumps and squats. I went with motion controls to simulate the innovation of the Wii remote that came decades later from Nintendo. I wanted to give a level of immersion for the player by simply taking away the need for someone to constantly press the arrow keys on the original NES controller, I thought that by giving motion the player would enjoy moving the character and maybe get rid of some frustrations from the physical stress that may be caused.  I simply used a familiar box to house all the electronics within them even though there are better housing equipment. There’s even a potentiometer that controls Mario’s sprint/fire ball off to the side. So nothing really too complicated, I wanted to simply use a twist because while the player is continuously moving the controller they also can manage the need to attack the opposing enemies. I had trouble figuring out the  bluetooth within the CPE with this particular project, and the design was also last minute as well. The electronics also were kinda of complicated because I was tossing so many design back and forth, plus getting the materials was also kind of difficult. The signature JUMP that Mario has was interesting because I had to constantly figure out what the delay and the orientation of the CPE needed to be to successfully do different jump heights. 


//Libraries
#include <Adafruit_CircuitPlayground.h>
#include <Adafruit_Circuit_Playground.h>
#include <bluefruit.h>

BLEDis bledis;
BLEHidAdafruit blehid;
int debounce = 100;


void setup() {
  // setup code here, to run once:
  //Init Library
  CircuitPlayground.begin();
  Serial.begin(9600);
  delay(1000);
  Serial.println("hello");
  Bluefruit.begin();
  Bluefruit.setTxPower(4);
  // Configure and Start Device info Service
  bledis.setManufacturer("Adafruit Industries");
  bledis.setModel("Bluefruit Feather 52");
  bledis.begin();
  // Start HID
  blehid.begin();
  //Start advertising device function
  Serial.println("pre start");
  startAdv();
  Serial.println("setup complete");

}
//CPE setup

void loop() {
  if (Bluefruit.connected() && digitalRead(7))
{
  // Accelerometer readings
  float x = CircuitPlayground.motionX();
  float y = CircuitPlayground.motionY();
  float z = CircuitPlayground.motionZ();
 int p = analogRead(A6);//Might delete
 //Check values/Check readings
  Serial.print("Bluefruit: ");
  Serial.print(Bluefruit.connected());
   Serial.print(digitalRead(7));
Serial.print(" Button: ");
   Serial.print(y);
   Serial.print("\t"); 
   Serial.print(x);
 Serial.print("\t");
 Serial.println();

   //Press W to JUMP, values from accelerometer mess with # for neutral state
 if ( y > -6) {
   blehid.keyPress('w');
   blehid.keyRelease();
   delay(5);
   //check readings
   Serial.println("In Y if");

  }
  //Press D to move RIGHT mess with # for neutral state
  if (x > 2 && y > -10 && y < -8 && z > -2 && z < 2) {
    blehid.keyPress('d'); 
     blehid.keyRelease();
    delay(5);
    //check readings
    }
    //Press A to move LEFT
    if (x > -2 && x < 2 && y > -10 && y < -8 && z < -2) {
    blehid.keyPress('a');
     blehid.keyRelease();
     //check readings
    delay(5);
    //
    }
    //potentiometer reading
    if(analogRead(A4) > 500) {
    uint8_t const report_id = 0;  // unsigned 8bit (1 byte) int
    uint8_t const modifier = 0;  // used by libraries to save space
    uint8_t keycode[6] = { 0 };  // normal int is 16 bit (4 bytes)
    keycode[0] = HID_KEY_ENTER; // HID_KEY_ARROW_LEFT this is the one being changed!
    blehid.keyboardReport(report_id, modifier, keycode);
    //check readings
 
  //if(analogRead(A4) > 500) { //then character will sprint/fireball

 
  }
 }
 else {Serial.println("no BLE");
 }
}
//Notes specific keys(hold) go to delay

void startAdv(void)
{
// Advertising packet
Bluefruit.Advertising.addFlags(BLE_GAP_ADV_FLAGS_LE_ONLY_GENERAL_DISC_MODE);
Bluefruit.Advertising.addTxPower();
Bluefruit.Advertising.addAppearance(BLE_APPEARANCE_HID_KEYBOARD);

// Include BLE HID service
Bluefruit.Advertising.addService(blehid);

// There is enough room for the dev name in the advertising packet
Bluefruit.Advertising.addName();

/* Start Advertising
* - Enable auto advertising if disconnected
* - Interval: fast mode = 20 ms, slow mode = 152.5 ms
* - Timeout for fast mode is 30 seconds
* - Start(timeout) with timeout = 0 will advertise forever (until connected)
*
* For recommended advertising interval
* https://developer.apple.com/library/content/qa/qa1931/_index.html
*/
Bluefruit.Advertising.restartOnDisconnect(true);
Bluefruit.Advertising.setInterval(32, 244); // in unit of 0.625 ms
Bluefruit.Advertising.setFastTimeout(30); // number of seconds in fast mode
Bluefruit.Advertising.start(0); // 0 = Don't stop advertising after n seconds
}


Game Controller Final Project

 Sonic Blue Ring Controller


My final project is crafted by using a Blue Pool Noodles with the CPE in front. The objective is to use it as one of those kart based controllers although it's simple in design it should get the job done I hope. The design is based on a Blue Ring or in this case pool noodle because I wanted to make it connected to Sonic in a way. Sonic a fast Blue Hedgehog and he collects ring so why not for the design to combine both and see where it lands and I think it works well for this project design wise. The input and output mapping so design wise I tried to make it so you can feel the button to jump which is map on the CPE to the A button and to pause you press the B button but for everything else I planned to input it by tilting the Blue Ring left and right to make basic moves and the idea is to rotate left and right and then pressing the A button to get places. Although it's not perfect but it does work but there's errors to it that I couldn't figure out but I think it would relate to the game at hand and the output would be Sonic gathering the input on each tilt you do. Signifiers would be the Blue Ring and the feedback would be seeing Sonic move originally I wanted to have a pixel light ring to tell you when you made the input but I couldn't figure it out so at best it would just respond to the movements. At the end of it all hopefully it should functions as it should as the video down below will demonstrate although not perfect hopefully it function and act like a nice controller.  

My one question would be if there's anything I can work on to improve on this whenever the coding or the design do you think it would be more like a interesting choice for a controller? Would it been beneficial to add in lights or sounds since I opted out of that.


#include <Keyboard.h>
#include <Adafruit_CircuitPlayground.h>
#include <Adafruit_Circuit_Playground.h>


float X, Y;
const int debounce = 150;
const int threshold = 500;


//Enter Key(B Button)= Pause/Start= B Buttton
//Left Arrow(21= Left Tilt
//Right Arrow= Right Tilt
//Up Arrow= Looking Up or moving up
//Down Arrow= Looking Down or Hiding Down aka flicking down
//Jump is S or Up Tilt or A button

void setup() {
  Serial.begin(9600);
  CircuitPlayground.begin();
  pinMode(CPLAY_LEFTBUTTON, INPUT_PULLDOWN); //button A
  pinMode(CPLAY_RIGHTBUTTON, INPUT_PULLDOWN); //button B
  Keyboard.begin();
}

void loop() {

  float x = CircuitPlayground.motionX();
  float y = CircuitPlayground.motionY();
  
 
 if(digitalRead(CPLAY_LEFTBUTTON)) {
  Keyboard.write('S');
  delay(debounce);
 }

if(digitalRead(CPLAY_RIGHTBUTTON)) {
  Keyboard.write(10);
  delay(debounce);
}
//left tilt
if(x < 7.5) {
  Keyboard.press(216);
  Keyboard.release(218);
  delay(debounce);

  //Moving Up
}if(y < 9.5 ) {
  Keyboard.press(218);
  Keyboard.release(217);
  delay(debounce);
}
//Tilt Right or Moving Right

if(x < -7.5) {
  
  Keyboard.press(215);
  Keyboard.release(216);
  delay(debounce);
}
Moving Down or tilting Down
if(y < -9.5) {
  Keyboard.press(217);
  Keyboard.release(215);
  delay(debounce);
}


Serial.print("\t");
Serial.println(Keyboard.press(217));
Serial.print("X: ");
Serial.print(X);
Serial.print("  Y: ");
Serial.print(Y);

}


https://youtu.be/nHgwRecqVzQ


Project: Game Controller - Dig Dug Pump Controller


DIG DUG PUMP


For this assignment, I created a controller for the game Dig Dug with a conceptual model based on the pump the player uses in the game. In Dig Dug, the player is tasked with defeating enemies using their pump to inflate them until they burst, all the while digging through the ground in order to get to them.

In order to simulate this, the player must pump the plunger at the top of the controller in order to send out their pump, mapped to the X key for the emulator's controls. The player must use the potentiometer knobs on the front of the enclosure in order to move vertically (left/red knob) and horizontally (right/blue knob), mapped to the up and down arrow keys and the left and right arrow keys respectively for the emulator's controls.

The enclosure has clear signifiers telling the player what to do in order to use it, with the pump itself reflecting the conceptual model of a standard real-life pump leading the player to pump it for the pumping mechanic, and the potentiometers labeled clearly as vertical and horizontal arrows representing the arrow keys and also the literal directions in which the player will move.


The back of the enclosure has two rudimentary access doors in order to troubleshoot and later potentially disassemble the controller and retrieve my supplies in the event that I need to reuse any internal elements.

The bottom half of the enclosure is where the CPB resides, with any wiring connecting to it attached here. This is also where the wire connecting the controller to the computer and, by extension, power source, leads out of the controller.


The top half of the enclosure is where the breadboard and other wiring reside atop a platform in the middle of the enclosure, with the potentiometers also glued into the enclosure here. The pump works by closing a circuit using two pieces of aluminum foil- one connected to positive voltage and one connected to ground- using a breadboarding wire attached to each respective piece of foil.


Code:
// Jacqueline Pavlat
// Final Project: Game Controller
// Dig Dug Pump


#include "Adafruit_TinyUSB.h"
#include <Adafruit_CircuitPlayground.h>
#include <Adafruit_Circuit_Playground.h>

// Keyboard Setup

// HID report descriptor using TinyUSB's template
// Single Report (no ID) descriptor
uint8_t const desc_hid_report[] =
{
  TUD_HID_REPORT_DESC_KEYBOARD()
};
 
// USB HID object. For ESP32 these values cannot be changed after this declaration
// desc report, desc len, protocol, interval, use out endpoint
Adafruit_USBD_HID usb_hid(desc_hid_report, sizeof(desc_hid_report), HID_ITF_PROTOCOL_KEYBOARD, 2, false);

//Debouncing
const int debounce = 100;

// Variables
int VPot = 0;
int HPot = 0;
int Vertical = 0;
int Horizontal = 0;

void setup()
{
 
  Serial.begin(9600);
  delay(1000);
  CircuitPlayground.begin();

  //PinOuts
  pinMode(A1, INPUT_PULLUP); // Pump
  pinMode(A2, INPUT_PULLDOWN); // Blue/Right Knob (Horizontal Movement)
  pinMode(A3, INPUT_PULLDOWN); // Red/Left Knob (Vertical Movement)

  pinMode(CPLAY_REDLED, OUTPUT); //LED

  usb_hid.begin();

}

void loop()
{

//Keyboard Setup

  uint8_t const report_id = 0; //unsigned 8bit (1 byte) int
  uint8_t const modifier = 0; //used by libraries to save space
  uint8_t keycode[6] = { 0 }; //normal int is 16 bit (4 bytes)

  //Pump
  if(digitalRead(A1) == 0)
  {
    //Maps Pump to X
    keycode[0] = HID_KEY_X;
    usb_hid.keyboardReport(report_id, modifier, keycode);
    delay(debounce);
    usb_hid.keyboardRelease(0);
  }

  //Horizontal Movement

  //Move Left
  HPot = analogRead(A2);
  Horizontal = map(HPot, 0, 1023, 0, 10);
  
  if(Horizontal == 10)
  {
    keycode[0] = HID_KEY_ARROW_LEFT;
    usb_hid.keyboardReport(report_id, modifier, keycode);
    delay(debounce);
  }

  //Stop Moving Horizontally
  if(Horizontal != 0 && Horizontal != 10)
  {
    usb_hid.keyboardRelease(0);
  }

  //Move Right
  if(Horizontal == 0)
  {
    keycode[0] = HID_KEY_ARROW_RIGHT;
    usb_hid.keyboardReport(report_id, modifier, keycode);
    delay(debounce);
  }

  //Vertical Movement

  VPot = analogRead(A3);
  Vertical = map(VPot, 0, 1023, 0, 10);
  
  if(Vertical == 10)
  {
    keycode[0] = HID_KEY_ARROW_UP;
    usb_hid.keyboardReport(report_id, modifier, keycode);
    delay(debounce);
  }

  //Stop Moving Vertically
  if(Vertical != 0 && Horizontal != 10)
  {
    usb_hid.keyboardRelease(0);
  }

  //Move Down
  if(Vertical == 0)
  {
    keycode[0] = HID_KEY_ARROW_DOWN;
    usb_hid.keyboardReport(report_id, modifier, keycode);
    delay(debounce);
  }
  
}

Unfortunately, during the process of creating this controller, my CPB began to malfunction and is no longer able to be recognized by my computer. Even with extra time, I was unable to fix my Circuit Playground. As a result, I am unable to demonstrate the controller's functionality, however, at the very least this can be gathered via the wiring and code presented.

Review Question:

  • How would you improve the code relating to the potentiometers?

David Trefry, Final Controller: Pinball Machine for Demon's Tilt

Game Controller: Pinball Controller for Demon's Tilt

My game controller is for a digital pinball game called Demon's Tilt. My controller's conceptual model is that of a pinball machine. It is meant to bring the arcade's analog appeal to this digital game.

This controller's enclosure has a sloping face and display monitor to display art from the game. Further, the input methods on the controller are placed where they would be on a pinball machine. The input methods of this controller are meant directly reflect the outputs in Demon's Tilt. 

The first input is a plunger on the controller;s front. There is a protruding shaft that must be pulled and released in order to launch the ball in game. This is an unconventional switch. When the plunger is pulled back, a circuit is broken and the controller outputs the "space" key. When the plunger is released, a spring pushes it back into place and completes the circuit. This directly mirrors the action of pulling back the plunger in game and launching the ball.

The second and third inputs both control the flippers in game. These are unconventional switches that do not mirror the buttons on an actual pinball machine, but instead, resemble pulling on the flippers themselves to strike the ball on the other end. Users pull this controller's levers towards themselves to activate the levers in game. When these levers are pulled back, their other ends complete circuits which output the "b" and "c" keys. When they are released, springs push them back, breaking the circuit.

Lastly, this controller uses the accelerometer on an internal CPB for the nudge inputs in game. When the user tilts the controller, it activates the "wasd" keys which nudges the ball in the four cardinal directions. This input directly mirrors how users would tilt a pinball machine, mirroring the in game output.

There are only two levers and a plunger sticking out of the enclosure which can be moved, which is a key constraint for the user. With knowledge of an actual pinball machine and its signifiers, the user is meant to presume the purpose of these protruding input options and what they signify; this includes how tilting a pinball machine is the literal way to nudge the ball. The user is intended to infer that they can tilt the controller in order to do the associated action in game.

For Peers:

How better might this controller convey its conceptual model and are its affordances clear? 

Schematic:


Video:


Code:

#include "Adafruit_TinyUSB.h"
#include <Adafruit_CircuitPlayground.h>
#include <Adafruit_Circuit_Playground.h>

//HID report descriptor using TinyUSB's template
//Single Report (no ID) descriptor
uint8_t const desc_hid_report[] =
{
  TUD_HID_REPORT_DESC_KEYBOARD()
};

//USB HID object. For ESP32 these values cannot be changed after this declaration
//desc report, desc len, protocol, interval, use out endpoint
Adafruit_USBD_HID usb_hid(desc_hid_report, sizeof(desc_hid_report), HID_ITF_PROTOCOL_KEYBOARD, 2, false);
//https://github.com/hathach/tinyusb/blob/master/src/class/hid/hid.h

//Variables
const int debounce = 100;
const int thresh = 500;

int rightFlipperPin = 6; //A1
int leftFlipperPin = 0; //A6
int plungerPin = 1; //A7


void setup() {
  // Standard setup
  Serial.begin(9600);
  CircuitPlayground.begin();
  pinMode(CPLAY_LEFTBUTTON, INPUT_PULLDOWN); //button A
  usb_hid.begin();

  //declaring pins
  pinMode(rightFlipperPin, INPUT_PULLDOWN);
  pinMode(leftFlipperPin, INPUT_PULLDOWN);
  pinMode(plungerPin, INPUT_PULLDOWN);
}

void loop() {
  //setting up variables for keyboard outputs through TinyUSB library
  uint8_t const report_id = 0; //unsigned 8bit (1 byte) int
  uint8_t const modifier = 0; //used by libraries to save space
  uint8_t keycode[6] = { 0 }; //normal int is 16 bit (4 byte)

  //Mapping accelerometer inputs to a discrete range
  float accelX = CircuitPlayground.motionX();
  int xMap = map(accelX, -10, 10, -1, 2);
  float accelY = CircuitPlayground.motionY();
  int yMap = map(accelY, -10, 10, -1, 2);

  //if the controller is titled left, the key "A" is output
    if(xMap > 0 && abs(accelX) > abs(accelY)){
      keycode[0] = 0x04; //HEX key A
      usb_hid.keyboardReport(report_id, modifier, keycode);
      delay(debounce);
      usb_hid.keyboardRelease(0);
    }
  //if the controller is titled right, the key "D" is output
    if(xMap < 0 && abs(accelX) > abs(accelY)){
      keycode[0] = 0x07; //HEX key D
      usb_hid.keyboardReport(report_id, modifier, keycode);
      delay(debounce);
      usb_hid.keyboardRelease(0);
    }
  //if the controller is titled back, the key "S" is output
    if(yMap > 0 && abs(accelY) > abs(accelX)){
      keycode[0] = 0x16; //HEX key S
      usb_hid.keyboardReport(report_id, modifier, keycode);
      delay(debounce);
      usb_hid.keyboardRelease(0);
    }
  //if the controller is titled forward, the key "W" is output
    if(yMap < 0 && abs(accelY) > abs(accelX)){
      keycode[0] = 0x1A; //HEX key W
      usb_hid.keyboardReport(report_id, modifier, keycode);
      delay(debounce);
      usb_hid.keyboardRelease(0);
    }

  //While the right flipper unconventional switch is closed, output "b"
    if(digitalRead(rightFlipperPin)){
      keycode[0] = 0x05; //HEX key right shift, b
      usb_hid.keyboardReport(report_id, modifier, keycode);
      delay(debounce);
    }
  //While the left flipper unconventional switch is closed, output "c"
    if(digitalRead(leftFlipperPin)){
      keycode[0] = 0x06; //HEX key left shift c
      usb_hid.keyboardReport(report_id, modifier, keycode);
      delay(debounce);
     }
  //While the plunger unconventional switch is open, output "space" key
    if(!digitalRead(plungerPin)){
      keycode[0] = 0x2C; //HEX key space
      usb_hid.keyboardReport(report_id, modifier, keycode);
      delay(debounce);
     }
  //when each loop completes, keyboard inputs are released
    usb_hid.keyboardRelease(0);
}

Kory Rogers Controller


This controller was made to replace the WASD/Arrow keys on the keyboard in an effort to move Pacman around the board. This features 2 forward and backward leaning joysticks that make Pacman steerable and intuitive for movement. I was originally going to fashion something up in terms of a steering wheel and throttle for the forward and back motion however I did not like the idea of reverse and forward changing as the direction of movement varies depending on where you are in the board. I utilized 2 rotary Encoders on here along with the Breadboard and Blue fruit to connect everything together. The hardest part of this entire project has been the coding as it has been since difficult to get the input from 2 rotary encoders to register as different. As seen in the picture we have a rudimentary design for getting the inputs and outputs of the game, The left joystick operates as an up and down motion for Pacman such as the Up and Down Arrow keys, while the right joystick does the Left and Right Arrows in its Up and Down motions. I believe that this was a necessary input change for Pacman as the original designs are very boring to say the least. The simple joystick was created to be just that with no more user feedback needed as it was targeted to be user friendly and easy to understand. This new way to play Pacman will allow players to feel as though they are actually operating him and this will give players more of a stress mechanic they can input into the controllers when you are being chased down by a ghost.

Question: How could I have smoothed out the inputs on the system using these rotary encoders? 


#include <Keyboard.h>

#include <Adafruit_CircuitPlayground.h>

#include <Adafruit_Circuit_Playground.h>


//Included Variables


int encoder0PinA = A2;

int encoder0PinB = A3;


int encoder0PinC = A1;

int encoder0PinD = A4;


int aState;

int aLastState;


int bState;

int bLastState;


void setup() {


  //Setting up Pins for the inputs

  pinMode (encoder0PinA, INPUT);

  pinMode (encoder0PinB, INPUT);

  pinMode (encoder0PinC, INPUT);

  pinMode (encoder0PinD, INPUT);

  Serial.begin (9600);

  Keyboard.begin();


  //Setting last state of the pins

  aLastState = digitalRead(encoder0PinD);

  bLastState = digitalRead(encoder0PinB);

}


void loop() {


  //Setting starting state of the pins

  aState = digitalRead(encoder0PinD);

  bState = digitalRead(encoder0PinB);


   //Checking if Left and Right movement state changed

   if (aState != aLastState){    


     if (digitalRead(encoder0PinC) != aState) {

      //Moves the player Right and Depresses all other keys

      Keyboard.press(KEY_RIGHT_ARROW);

      Keyboard.release(KEY_LEFT_ARROW);

      Keyboard.release(KEY_DOWN_ARROW);

      Keyboard.release(KEY_UP_ARROW);


     } else {

      //Moves the player Left and Depresses all other keys

      Keyboard.press(KEY_LEFT_ARROW);

      Keyboard.release(KEY_RIGHT_ARROW);

      Keyboard.release(KEY_DOWN_ARROW);

      Keyboard.release(KEY_UP_ARROW);

     }

   }


   //Checking if Up and Down movement state changed

   if (bState != bLastState){    


     if (digitalRead(encoder0PinA) != bState) {

      //Moves the player Up and Depresses all other keys

      Keyboard.press(KEY_UP_ARROW);

      Keyboard.release(KEY_DOWN_ARROW);

      Keyboard.release(KEY_LEFT_ARROW);

      Keyboard.release(KEY_RIGHT_ARROW);


     } else {


      //Moves the player Down and Depresses all other keys

      Keyboard.press(KEY_DOWN_ARROW);

      Keyboard.release(KEY_UP_ARROW);

      Keyboard.release(KEY_LEFT_ARROW);

      Keyboard.release(KEY_RIGHT_ARROW);

     }

   }

   aLastState = aState;

   bLastState = bState;

}