20 September 2023
17 September 2023
Electronics Team 14 - Sword Switch
Scaffolding: Unconventional Switch
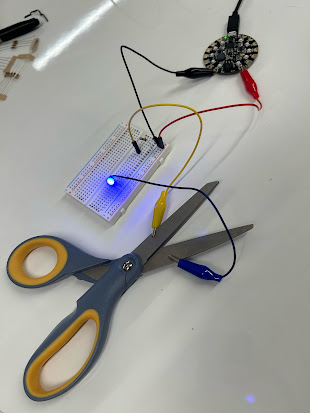
Our switch definitely puts the unconventional in this assignment as our unconventional switch is powering our blue LED by tapping two scissors together and keeping it on as long as they’re tapped together and when you take them apart the light turns off. While there were a few challenges over all our design choice was simple yet effective. To achieve this all we needed was three one-hundred ohm resistors, two alligator clips for our 9v battery and scissors. For the narrative behind our switch is craftsmanship and creativity. A reason someone could possibly use this kind of switch may not be to turn on an LED light there is also but being able to be used for art reasons. Like the videos we saw before we could use such a switch to represent something, a cause for it generating energy.
Unconventional Switch - Banana Conductor
Fruit and vegetables like bananas are able to conduct electricity, due to being ionic conductors. Ionic conductors are objects that contain both positive and negative charges. In hopes of saving money on this project, we decided to try to find an object that we already had lying around, so we went with a banana. I would say using a banana is a pretty unconventional way of using electricity. With our banana, we stuck the positive part of the circuit into the meat of the banana, while we stuck the other end just in the peel, via the stem. Once powered on, the LED lit up due to the electronic currents traveling through the banana.
Electronics Team 18: Unconventional Switch
Unconventional Switch: Button Orientation
Our unconventional switch is inspired by wearing a button! With our unconventional switch you never have to worry about whether or not the button you're wearing is oriented correctly, and people can see it properly. Our unconventional switch uses the five volts from the CPE and passes it through to a tilt switch. The tilt switch is attached to the back of a button and will detect whether the button is oriented correctly or not. The circuit then continues through to a 100 Ohm resistor, and finally to an LED that will stay lit as long as the button is oriented correctly.
Electronic Team 1 (Morgan Demunck and Clair Elso) - Unconventional Switch - Soil Measurement
Unconventional Switch: Electronics Team 4 Tyler Cook & Matthew Polfer
Unconventional Switch - Ring Toss - Electronics Team 6 - Alex Zondervan & Ian Thomas
Unconventional Switch - Electric Mints
For
our Unconventional Switch, we used a can of Altoids opening and closing to
control the LED. On the can itself, the alligator clips are attached to the top
and bottom parts where the can closes. The perimeter of the can is conductive,
so the bottom alligator clip is attached with a rubber band and touches the top
part of the can once it is closed. The idea behind this switch is that you know
whether you’ve actually closed the can to avoid spilling them. It’s also a fun
way of turning the LED on and off. Were this idea to be fully implemented, the
switch would of course not require the rubber band and would control the
conductivity of the can a bit better.
Patrick, THE LID! - Electronics Team 13 Garrett Tower & Luis Hernandez
16 September 2023
Unconventional Switch - Reverse Switch - Electronics Team 3
For our switch we used a green LED and the Circuit Playground as the power source. The idea behind out switch was to create an ironic mirror of a normal switch, where normally the current would pass through the "wiring", our current passes through the level itself, and you can see the alligator clamp actually appears to be holding the lever itself, as if it were actually the one flipping it and powering the current. The plate allows the current to pass through, of course, but it is also more effortless than actually flipping a switch yourself, furthering the idea of the alligator clamp doing all of the work.
Unconventional Switch: Electronics Team 5 - Joseph Donnelly & Max Martinez
Unconventional Switch: Electronics Team 2 - Amon Guerrero & Michael Magram
This simple circuit utilizes the zippers from a laptop bag to create an unconventional switch. Using a Circuit Playground Express connected to a laptop as its power source, the alligator clips carry voltage to the zippers first, which are enhanced with a bit of tin foil. If the zippers are touching, indicating that the bag is closed, the circuit will have continuity and light the LED. If the zippers are not touching, the LED will not light up and this indicates that the bag is open. The purpose of this circuit is help users keep their belongings safe by telling them if their bag is open or not.
Video Link: https://youtu.be/BD6VOwXZf1A
Unconventional Switch: Team 9 - Griffin Shields & Logan Burnett
From our 5-volt power source, the circuit playground, from
the VOUT side, we’ve used an alligator clip wire to connect it to a 100 ohm
resistor, and then with another alligator wire, we have connected the resistor
to a yellow 3v LED. Connected to the LED, (again, via an alligator clip wire)
is a dual button system comprising of first an actual button, alligator wired
to a metal key, which to complete the circuit must be physically applied to a
metal spoon, which has an alligator wire on the other end, acting as a
connection to the ground, closing the circuit. The full circuit looks like
Circuit playground > wire > resistor > wire > LED > wire >
button > wire > key > spoon > wire > back to playground.
15 September 2023
Unconventional Switch: Team 12 - Michael Kocis & Ricky Elia
Video Link: https://youtu.be/TAZWM8aDd7c?si=05Ii84GKS0_o7gwj
14 September 2023
Unconventional Switch - Austin Becker & Gabriel Nash
https://youtu.be/QI7Zn7I1Jzs?si=cqZsMi5kLhVuwPkj
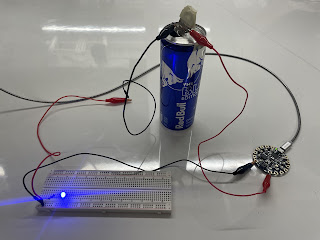
Key and Lock Soda Can
Our Unconventional Switch is rather simple setup. It begins
with 5 volts of power being fed from our Circuit Board Playground and attached to
our standard key, which acts as our conductor. We then slot the key
specifically into the Red Bull cap which is the only part of the can that is
conductive. The volts channel from the key to the cap and then into the bread
board. The current is then fed through our Resistor which is measured to be
about 100 Ohms. This gives our LED light the exact amount of voltage it needs
to power on at 3 volts. And finally, the circuit is complete and the remaining
power is ground.
The Unconventional Triangular Prism
Hello all! Today, I’m going to show you what I call “The Triangular
Prism”. The prism is an object with two metal paper clips sticking out of it,
both being connected to the breadboard. The power source for this is the
Adafruit Playground Express, outputting 5 volts into the circuit. The device
uses one resistor to light up a blue LED light, which takes up to 3 volts of
electricity. The circuit on the prism is completed using a popsicle stick wrapped
in aluminum foil and taped with copper tape. The initial idea was to have the prongs
on the copper tape, but the design proved to be too small for that, and having
the popsicle stick’s aluminum foil touching both of the paper clips works just
as well.


