20 April 2025

Team 16: Binoculars Controller

 By Final Team 16: Jordan Norton & Briah Bellamy

Controller


Description

·    Design:

Our controller is a pair of binoculars that players hold to play the game “A Short Hike”. “A Short Hike” is a game centered around exploring a mountain on the way up to its summit, encouraging players to tread off the beaten path along their journey, so this controller also fits the nature exploration narrative. When conceptualizing this controller, different exploration tools were used to connect to the game’s main narrative, and we found this design is the most cohesive. The conceptual model we chose, binoculars, is representative of hikers using them for exploration purposes, something highly recommended and encouraged for the player’s journey.

·       Input to Output mapping:

“A Short Hike” is relatively simple control-wise, with arrow keys for Movement, Z key for Jump/Fly/Glide, X key for Use Item/Interact, and Escape key for Menu/Inventory.

  • Arrow keys are mapped to the Bela Trill ring
  • Z key is mapped to forward swipe on the Bela Trill bar
  • X key is mapped to a backward swipe on the Trill bar
  • Escape key is mapped to gesturing with the Trill bar

·       Relationship between signifiers and feedback, and how all of that connects to the theme of the game:

Signifiers are the clues given to guide users along their experiences, such as doors labeled “Push” or “Pull” to guide people how they can be opened. In “A Short Hike”, this would include visual cues in-game to teach players how to play or that incentivize them to venture off the beaten path. Feedback informs users that they’re actually taking action in their experiences, usually by following signifiers such as doors opening after pushing or pulling them. For “A Short Hike”, the visual signifiers could change when proper actions are taken and, perhaps, there would be interesting new places and treasures to reward & further encourage the nature exploration.

Contributions

·    Jordan Norton:

  • Conceptual Controller Sketch & Prototype
  • Materials
  • Coding & Schematics

·    Briah Bellamy:

  • High Fidelity Controller Sketch
  • Blog Posts
  • 3D Modeling & Spray Painting
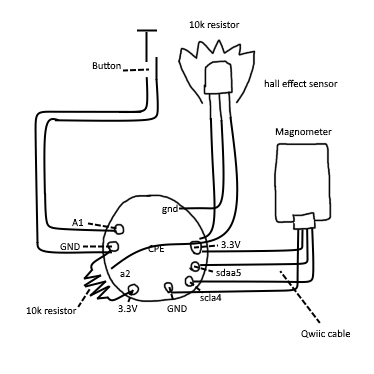
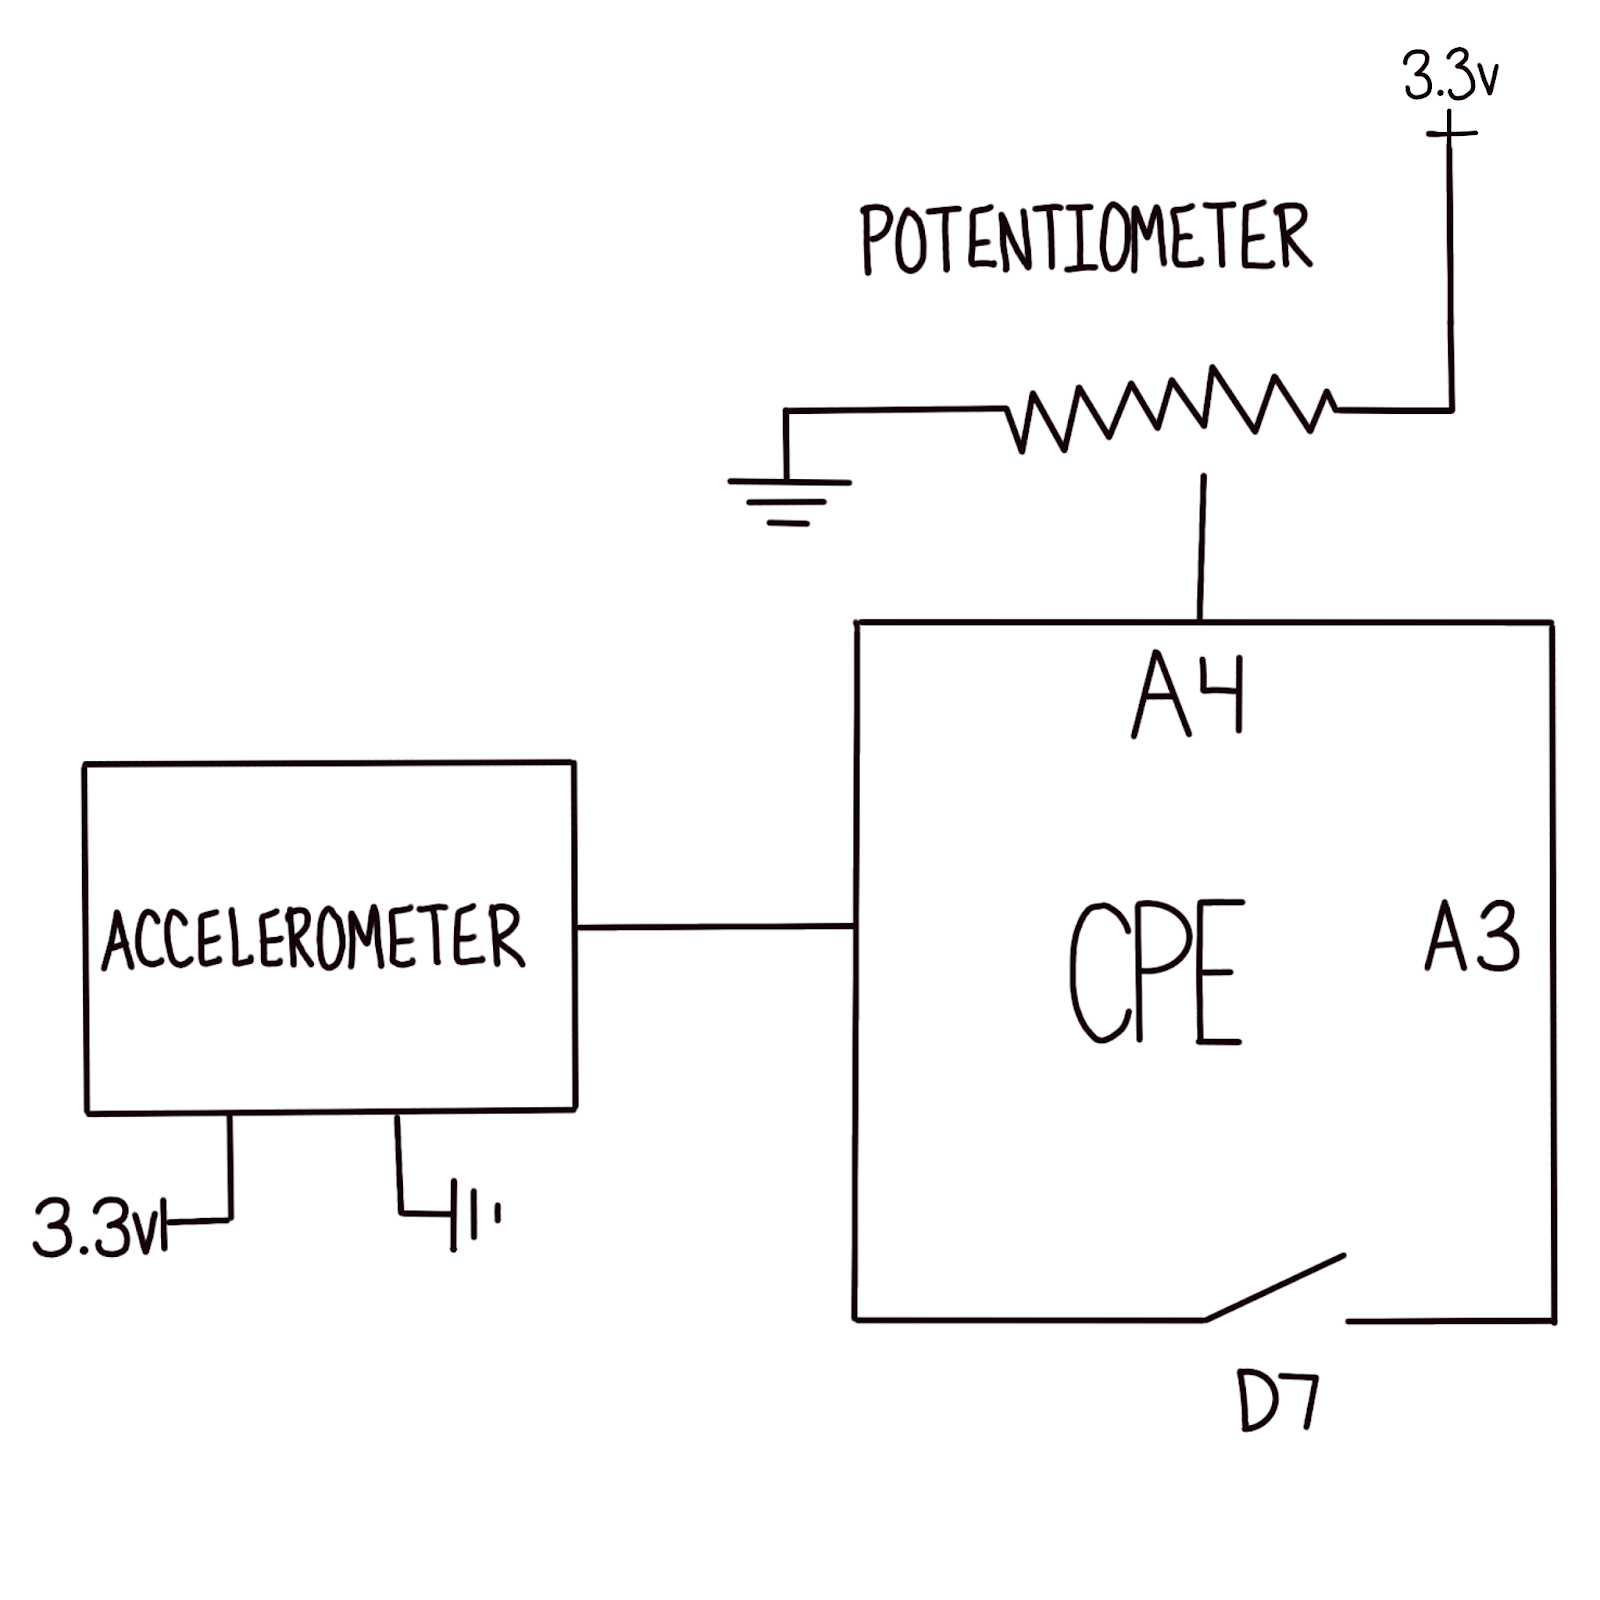
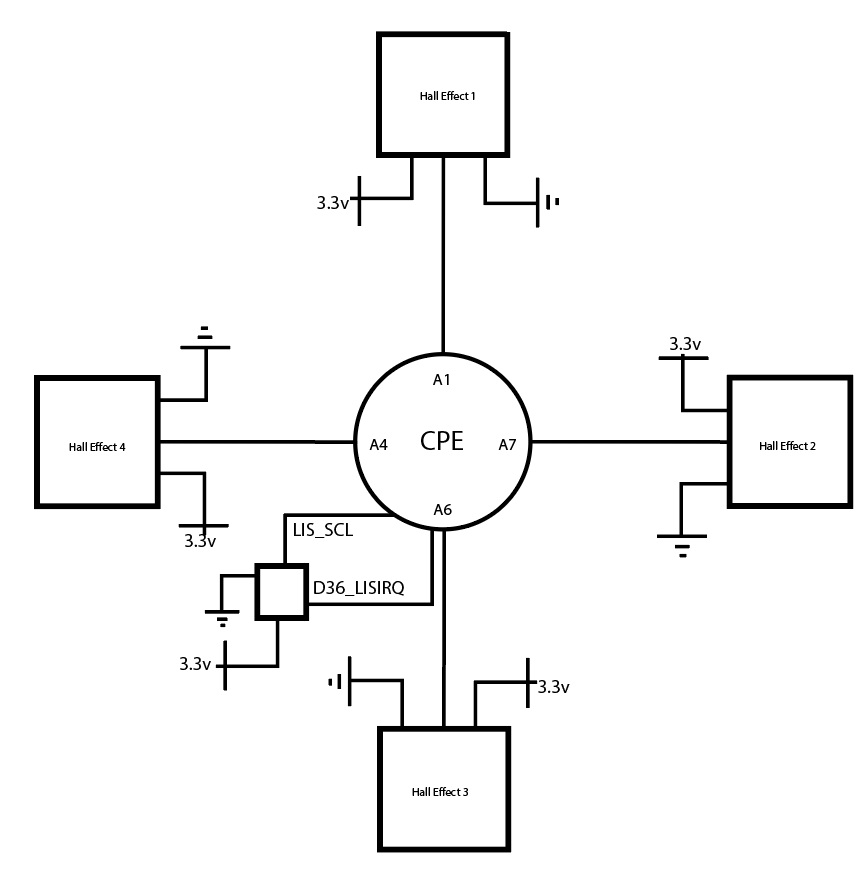
Schematic

Code

#include <Trill.h>
#include <Adafruit_CircuitPlayground.h>
#include <Adafruit_Circuit_Playground.h>
#include <Keyboard.h>

//Controller code for A Short Hike
//Jordan Norton and Briah Bellamy

Trill bar;      //Trill variable for the bar
Trill ring;     //Trill variable for the ring

//Bool variables for detecting if the sensors have been touched (used for resetting inputs after each loop)
bool barTouched = false;
bool ringTouched = false;

//Input variables for trill bar
int currentPoint = -1;
int point1 = -1;
int point2 = -1;
int point3 = -1;

//Input variables for trill ring (second finger is for receinving the "open menu" gesture)
int direction;
int secondFingerRing;

void setup() {
  // put your setup code here, to run once:

  Serial.begin(115200);
  CircuitPlayground.begin();

  int retBar = bar.setup(Trill::TRILL_BAR);     //Try to initialize bar
  int retRing = ring.setup(Trill::TRILL_RING);   //Try to initialize ring

  //Check trill bar initialization for errors
  if(retBar != 0) {
    Serial.println("failed to initialise trill bar");
    Serial.print("Error code: ");
    Serial.println(retBar);
  }

  //Check trill ring initialization for errors
  if(retRing != 0) {
    Serial.println("failed to initialise trill ring");
    Serial.print("Error code: ");
    Serial.println(retRing);
  }

  Keyboard.begin();
  
}

void loop() {
  // put your main code here, to run repeatedly:
  //Serial.print("In the loop");

  bar.read();   //Read the trill bar
  ring.read();  //Read the trill ring

  direction = map(ring.touchLocation(0), 0, 3600, 0, 7);
  //secondFingerRing = map(ring.touchLocation(1), 0, 3600, 0, 7);

  //Trill bar input
  if(bar.getNumTouches() > 0) {

    currentPoint = bar.touchLocation(0);

    if ( point1 == -1 ) {

      point1 = currentPoint;
    }

    if ( point2 == -1 ) {
      
      point2 = currentPoint;
    }

    point3 = currentPoint;

    //Acknowledge that the bar was touched
    barTouched = true;

    //Debounce delay
    delay(10);

    Serial.print("currentPoint is ");
    Serial.print(currentPoint);
    Serial.print("\n");
    Serial.print("point1 is ");
    Serial.print(point1);
    Serial.print("\n");
    Serial.print("point2 is ");
    Serial.print(point2);
    Serial.print("\n");

  }
  else if(barTouched) {

    if ( (point1 != -1) && (point2 != -1) ) {
      if ( point1 > ( point2 + 100 ) ) {

        Keyboard.press('z');

        currentPoint = -1;
        point1 = -1;
        point2 = -1;
        point3 = -1;
      }
      else if ( point1 < ( point2 - 100 ) ) {

        Keyboard.press('x');

        currentPoint = -1;
        point1 = -1;
        point2 = -1;
        point3 = -1;
      }
      else if ( (point3 < point1) && (point3 > -1) ) {

        Keyboard.press(KEY_ESC);

        currentPoint = -1;
        point1 = -1;
        point2 = -1;
        point3 = -1;
      }
    }

    Keyboard.release('z');
    Keyboard.release('x');
    Keyboard.release(KEY_ESC);
    Serial.println("Z released");
    Serial.println("X released");
    Serial.println("Escape released");

    //Acknowledge that the bar is no longer being touched
    barTouched = false;

  }

  //Trill ring input
  //When a direction is inputted, all keys but but the selected direction are released
  //This allows for 360 degrees of smooth movement where the player never has to take their finger off the trill ring
  if(ring.getNumTouches() > 0) {
    //South
    if (direction == 0) {
      Keyboard.press(KEY_DOWN_ARROW);
      Serial.println("Down pressed");

      Keyboard.release(KEY_UP_ARROW);
      Keyboard.release(KEY_RIGHT_ARROW);
      Keyboard.release(KEY_LEFT_ARROW);
    }

    //Southeast
    if (direction == 1) {
      Keyboard.press(KEY_DOWN_ARROW);
      Keyboard.press(KEY_LEFT_ARROW);
      Serial.println("Down and right pressed");

      Keyboard.release(KEY_UP_ARROW);
      Keyboard.release(KEY_RIGHT_ARROW);
    }

    //East
    if (direction == 2) {
      Keyboard.press(KEY_LEFT_ARROW);
      Serial.println("Right pressed");

      Keyboard.release(KEY_UP_ARROW);
      Keyboard.release(KEY_RIGHT_ARROW);
      Keyboard.release(KEY_DOWN_ARROW);
    }

    //Northeast
    if (direction == 3) {
      Keyboard.press(KEY_LEFT_ARROW);
      Keyboard.press(KEY_UP_ARROW);
      Serial.println("Right and up pressed");

      Keyboard.release(KEY_RIGHT_ARROW);
      Keyboard.release(KEY_DOWN_ARROW);
    }

    //North
    if (direction == 4) {
      Keyboard.press(KEY_UP_ARROW);
      Serial.println("Up pressed");

      Keyboard.release(KEY_RIGHT_ARROW);
      Keyboard.release(KEY_DOWN_ARROW);
      Keyboard.release(KEY_LEFT_ARROW);
    }

    //Northwest
    if (direction == 5) {
      Keyboard.press(KEY_UP_ARROW);
      Keyboard.press(KEY_RIGHT_ARROW);
      Serial.println("Up and left pressed");

      Keyboard.release(KEY_DOWN_ARROW);
      Keyboard.release(KEY_LEFT_ARROW);
    }

    //West
    if (direction == 6) {
      Keyboard.press(KEY_RIGHT_ARROW);
      Serial.println("Left pressed");

      Keyboard.release(KEY_UP_ARROW);
      Keyboard.release(KEY_DOWN_ARROW);
      Keyboard.release(KEY_LEFT_ARROW);
    }

    //Southwest
    if (direction == 7) {
      Keyboard.press(KEY_RIGHT_ARROW);
      Keyboard.press(KEY_DOWN_ARROW);
      Serial.println("Left and down pressed");

      Keyboard.release(KEY_UP_ARROW);
      Keyboard.release(KEY_LEFT_ARROW);
    }

    //Acknowledge that the ring was touched
    ringTouched = true;

    //Debounce delay
    delay(10);
    
  }
  else if(ringTouched) {

    //Release all movement keys
    Keyboard.release(KEY_UP_ARROW);
    Keyboard.release(KEY_RIGHT_ARROW);
    Keyboard.release(KEY_DOWN_ARROW);
    Keyboard.release(KEY_LEFT_ARROW);
    Serial.println("Arrow key(s) released");

    //Acknowledge that the ring is no longer being touched
    ringTouched = false;
  }
}

Demonstration


  Open Ended Question:

How could we implement signifiers to better indicate controls without marking up the sensors?


Team 2: Project Diva Controller


The general design of this controller was made to call into reference the favorite foods of the main character of the game, Miku Hatsune. Based off a Leek, a type of onion, this controller was made to play Project Diva. This rhythm game is played by pressing inputs to the beat of the song being played. It uses a color sensor at the end of the green part to translate certain colors into keyboard inputs. The idea was that instead of pressing WASD or Arrow keys to the beat of the song, you point the controller to colored tiles in front of you to the beat. Colored tiles are placed in the corresponding position to help the player understand what color leads to what input. An LED in the center also shines with the color detected to both make the controller more visually interesting and add a sense of feedback. A variable switch at the bottom is one of the inputs so that the controller can be customizable. The controller was also designed for easy assembly and disassembly, being able to split into 3 different pieces for transport. There is also a space behind the board to allow storage of cables and help avoid messes or tangles.

Inputs and Outputs:

TCS3200 (Color Sensor):

RED (A)

Green (W)

Blue (D)

B10K Potentiometer (S)

3_Clr(RGB Module):

Corresponds with the color detected and projects that color.


The circuit are all connected with the Arduino Leonardo which allows us to emulate keyboard functions.


What do you think about the overall look of the controller? 

How do you think about the colored based and visual feedback response affect the player engagement for the game? 


#include <Keyboard.h> //Keyboard Emulation

// Color pins
#define RedLED 9
#define GreenLED 10
#define BlueLED 11

#define S0 4 //Frequency Scaling
#define S1 5
#define S2 6 // Pin 567 are for color filter
#define S3 7
#define sensorOut 8

// Potentiometer pin (using 3.3v)
#define POT_PIN A0
int potThreshold = 450;

// Calibration values for Black and White
int redMin = 130; // White R-130 G-110 B-80 (MIN)
int redMax = 955; // Black R-955 G-845 B-610 (MAX)
int greenMin = 110;
int greenMax = 845;
int blueMin = 80;
int blueMax = 610;

// Pulse Width variables (TCS3200)
int redPW = 0;
int greenPW = 0;
int bluePW = 0;

// RGB values (0-255 scale)
int redValue;
int greenValue;
int blueValue;

void setup() {
  // Color sensor pin
  pinMode(S0, OUTPUT);
  pinMode(S1, OUTPUT);
  pinMode(S2, OUTPUT);
  pinMode(S3, OUTPUT);
  pinMode(sensorOut, INPUT); // Frequency

  // LED pin
  pinMode(RedLED, OUTPUT);
  pinMode(GreenLED, OUTPUT);
  pinMode(BlueLED, OUTPUT);

  // Sensor scaling
  digitalWrite(S0, HIGH); // Set to 100%
  digitalWrite(S1, LOW);

  Serial.begin(9600);
  Keyboard.begin();  // Starts keyboard emulation
}

void loop() {
  // Read red
  redPW = getRedPW(); // Gets the color that is put infront of the TCS3200
  redValue = map(redPW, redMin, redMax, 255, 0);
  delay(100);

  // Read green
  greenPW = getGreenPW();
  greenValue = map(greenPW, greenMin, greenMax, 255, 0);
  delay(100);

  // Read blue
  bluePW = getBluePW();
  blueValue = map(bluePW, blueMin, blueMax, 255, 0);
  delay(100);

  // COLOR LOGIC //

  // Red (A)
  if (redValue > greenValue && redValue > blueValue && redValue > 140) {
    Serial.println("RED (A)");
    digitalWrite(RedLED, HIGH); // Outputs Color Red
    digitalWrite(GreenLED, LOW);
    digitalWrite(BlueLED, LOW);
    Keyboard.press('a'); // Outputs keypress (A)
    delay(100);
    Keyboard.release('a');
  }

  // Green (W)
  else if (greenValue > redValue && greenValue > blueValue && greenValue > 140) {
    Serial.println("Green (W)");
    digitalWrite(RedLED, LOW);
    digitalWrite(GreenLED, HIGH); // Outputs Color Green
    digitalWrite(BlueLED, LOW);
    Keyboard.press('w'); // Outputs keypress (W)
    delay(100);
    Keyboard.release('w');
  }

  // Blue (D)
  else if (blueValue > redValue && blueValue > greenValue && blueValue > 140) {
    Serial.println("Blue (D)");
    digitalWrite(RedLED, LOW);
    digitalWrite(GreenLED, LOW);
    digitalWrite(BlueLED, HIGH); // Outputs Color Blue
    Keyboard.press('d'); // Outputs keypress (D)
    delay(100);
    Keyboard.release('d');
  }

  // No colors shown
  else {
    Serial.println("No Color Detected");
    digitalWrite(RedLED, LOW);
    digitalWrite(GreenLED, LOW);
    digitalWrite(BlueLED, LOW);
  }

  // B10K POTENTIOMETER //

  int potValue = analogRead(POT_PIN); // Reads Potentiometer

  if (potValue > potThreshold) {
    Serial.println("Potentiometer is alive (S)");
    Keyboard.press('s'); // Outputs keypress (S)
    delay(100);
    Keyboard.release('s');
  }

  // Debugging Output
  Serial.print("Red = ");
  Serial.print(redValue);
  Serial.print(" | Green = ");
  Serial.print(greenValue);
  Serial.print(" | Blue = ");
  Serial.print(blueValue);
  Serial.print(" | Pot = ");
  Serial.println(potValue);
}

// TCS3200 FUNCTIONS //
// Returns pulse for Red light
int getRedPW() {
  digitalWrite(S2, LOW);
  digitalWrite(S3, LOW);
  return pulseIn(sensorOut, LOW);
}
// Returns pulse for Green light
int getGreenPW() {
  digitalWrite(S2, HIGH);
  digitalWrite(S3, HIGH);
  return pulseIn(sensorOut, LOW);
}
// Returns pulse for Blue light
int getBluePW() {
  digitalWrite(S2, LOW);
  digitalWrite(S3, HIGH);
  return pulseIn(sensorOut, LOW);
}


Team 13's Balan Wonderworld Controller


Our Balan Wonderworld controller is based on the iconic hat found in the game. The hat is a signature piece for both the game and the character, found on a majority of its marketing and game collectibles. We thought controlling Balan’s hat would be the best way to experience the game and feel like a showman character. The hat is separated into 3 pieces: the inner hat, the printed out Ball Bearings, and the outer hat. The outer hat is shaped and sewn using foam and fabric to create the curvature of the sides and the brim of the hat. Creating the inner hat was also another focus to house the wires and Arduino without tangling the cables. The ball bearings were an interesting component to both conceive and print, but we found the concept fun to control the character’s attire.

The design of the hat controller uses an unconventional button to use the character’s costume action by pressing the top of the hat. Along with the button, the player tilts their head forward to automatically move forward and turn their head left or right to turn the character in either direction. And finally, to change costumes, the player spins the hat in a complete 360. This design allows you to feel more connected to Balan and his whimsical world of props and sets.

Inputs - Outputs:
(Magnetometer Z axis) - W key (Forward movement)
(Unconventional Button) - Space Bar (Ability)
(Magnetometer Y axis) - Mouse Movement (Turn camera)
(Hall Effect Sensor) - C key (Change costumes)

Video:


Code:
// Basic demo for magnetometer readings from Adafruit LIS3MDL
#include <Adafruit_CircuitPlayground.h>
#include <Adafruit_Circuit_Playground.h>

#include <Wire.h>
#include <Adafruit_LIS3MDL.h>
#include <Adafruit_Sensor.h>

#include <Keyboard.h>
#include <KeyboardLayout.h>
#include <Keyboard_da_DK.h>
#include <Keyboard_de_DE.h>
#include <Keyboard_es_ES.h>
#include <Keyboard_fr_FR.h>
#include <Keyboard_hu_HU.h>
#include <Keyboard_it_IT.h>
#include <Keyboard_pt_PT.h>
#include <Keyboard_sv_SE.h>
#include <Mouse.h>

Adafruit_LIS3MDL lis3mdl;
#define LIS3MDL_CLK 13
#define LIS3MDL_MISO 12
#define LIS3MDL_MOSI 11
#define LIS3MDL_CS 10

bool on = true;
bool switchTrigger=false;

float initialCalibrationx;
float initialCalibrationy;
float initialCalibrationz;

float vectorx;
float vectorz;

float localizeddirection;

int incomingByte = 0; // Variable to store the received byte

void setup(void) {
  Serial.begin(115200);
  while (!Serial) delay(10);     // will pause Zero, Leonardo, etc until serial console opens

  //pinMode(A1, INPUT_PULLUP); // Enable pull-up for button press
  //pinMode(CPLAY_SLIDESWITCHPIN, INPUT_PULLUP);

  Serial.println("Adafruit LIS3MDL test?");
  
  // Try to initialize!
  if (! lis3mdl.begin_I2C()) {          // hardware I2C mode, can pass in address & alt Wire
  //if (! lis3mdl.begin_SPI(LIS3MDL_CS)) {  // hardware SPI mode
  //if (! lis3mdl.begin_SPI(LIS3MDL_CS, LIS3MDL_CLK, LIS3MDL_MISO, LIS3MDL_MOSI)) { // soft SPI
    Serial.println("Failed to find LIS3MDL chip");
    while (1) { delay(10); }
  }
  Serial.println("LIS3MDL Found!");

  lis3mdl.setPerformanceMode(LIS3MDL_MEDIUMMODE);
  Serial.print("Performance mode set to: ");
  switch (lis3mdl.getPerformanceMode()) {
    case LIS3MDL_LOWPOWERMODE: Serial.println("Low"); break;
    case LIS3MDL_MEDIUMMODE: Serial.println("Medium"); break;
    case LIS3MDL_HIGHMODE: Serial.println("High"); break;
    case LIS3MDL_ULTRAHIGHMODE: Serial.println("Ultra-High"); break;
  }

  lis3mdl.setOperationMode(LIS3MDL_CONTINUOUSMODE);
  Serial.print("Operation mode set to: ");
  // Single shot mode will complete conversion and go into power down
  switch (lis3mdl.getOperationMode()) {
    case LIS3MDL_CONTINUOUSMODE: Serial.println("Continuous"); break;
    case LIS3MDL_SINGLEMODE: Serial.println("Single mode"); break;
    case LIS3MDL_POWERDOWNMODE: Serial.println("Power-down"); break;
  }

  lis3mdl.setDataRate(LIS3MDL_DATARATE_155_HZ);
  // You can check the datarate by looking at the frequency of the DRDY pin
  Serial.print("Data rate set to: ");
  switch (lis3mdl.getDataRate()) {
    case LIS3MDL_DATARATE_0_625_HZ: Serial.println("0.625 Hz"); break;
    case LIS3MDL_DATARATE_1_25_HZ: Serial.println("1.25 Hz"); break;
    case LIS3MDL_DATARATE_2_5_HZ: Serial.println("2.5 Hz"); break;
    case LIS3MDL_DATARATE_5_HZ: Serial.println("5 Hz"); break;
    case LIS3MDL_DATARATE_10_HZ: Serial.println("10 Hz"); break;
    case LIS3MDL_DATARATE_20_HZ: Serial.println("20 Hz"); break;
    case LIS3MDL_DATARATE_40_HZ: Serial.println("40 Hz"); break;
    case LIS3MDL_DATARATE_80_HZ: Serial.println("80 Hz"); break;
    case LIS3MDL_DATARATE_155_HZ: Serial.println("155 Hz"); break;
    case LIS3MDL_DATARATE_300_HZ: Serial.println("300 Hz"); break;
    case LIS3MDL_DATARATE_560_HZ: Serial.println("560 Hz"); break;
    case LIS3MDL_DATARATE_1000_HZ: Serial.println("1000 Hz"); break;
  }
  
  lis3mdl.setRange(LIS3MDL_RANGE_4_GAUSS);
  Serial.print("Range set to: ");
  switch (lis3mdl.getRange()) {
    case LIS3MDL_RANGE_4_GAUSS: Serial.println("+-4 gauss"); break;
    case LIS3MDL_RANGE_8_GAUSS: Serial.println("+-8 gauss"); break;
    case LIS3MDL_RANGE_12_GAUSS: Serial.println("+-12 gauss"); break;
    case LIS3MDL_RANGE_16_GAUSS: Serial.println("+-16 gauss"); break;
  }

  lis3mdl.setIntThreshold(500);
  lis3mdl.configInterrupt(false, false, true, // enable z axis
                          true, // polarity
                          false, // don't latch
                          true); // enabled!


  Mouse.begin();

  // on start, get current direction and set that as forward
  sensors_event_t event; 
  lis3mdl.getEvent(&event);
  initialCalibrationx = event.magnetic.x;
  initialCalibrationy = event.magnetic.y;
  initialCalibrationz = event.magnetic.z;

  pinMode(A1, INPUT_PULLUP); // Enable pull-up for button press

}

void loop() {

  lis3mdl.read();      // get X Y and Z data at once
  sensors_event_t event; 
  lis3mdl.getEvent(&event);

  if (on == true){

  Serial.print("running");

  int buttonState = digitalRead(A1); // Read the state of the external button

  /////////////////////////// JUMP //////////////////////////////
  int A1sensorValue = analogRead(A1); // Read the analog value from A1
  float voltage = A1sensorValue * (3.3 / 1023.0); // Convert to voltage
  if (voltage<0.5){
    Keyboard.press(' ');
  }else{
    Keyboard.release(' ');
  }
  ///////////////////////////////////////////////////////////////

  /////////////////////////// COSTUME CHANGE ///////////////////////////////
  int A2sensorValue = analogRead(A2); // Read the analog value from pin A2
  if (A2sensorValue==1 && switchTrigger == false){
    switchTrigger = true;
    Keyboard.press('c');
    delay(10);
    Keyboard.release('c');
    delay(1000); //debounce so costume doesn't switch multiple times while hat is going back to position
    switchTrigger = false;
  }
  ////////////////////////////////////////////////////////////////////////////

    /* Display the results (magnetic field is measured in uTesla) */
    //Serial.print("\tX: "); Serial.print(event.magnetic.x-initialCalibrationx); 
    //Serial.print(" \tY: "); Serial.print(event.magnetic.y-initialCalibrationy);
    //Serial.print(" \tZ: "); Serial.print(event.magnetic.z-initialCalibrationz); 

    ///////////////////////// CALCULATE INPUT DIRECTION //////////////////////////
    //using the magnometer's orientation in 3d space and atan2, get the LOCAL yaw direction of the hat (allows the head turn input to be unaffected by any imbalance)
      localizeddirection = atan2(event.magnetic.x-initialCalibrationx,event.magnetic.z-initialCalibrationz);//vectorx,vectorz);
      Mouse.move(localizeddirection*10, 0, 0);
    //////////////////////////////////////////////////////////////////////////////


    /////////////////////////////// START / STOP WALKING ///////////////////////////////
    // if player nods forward, toggle holding w. if they nod backwards, let go of w
    if (event.magnetic.z-initialCalibrationz>=10) {
      Keyboard.press('w');
    }
      if (event.magnetic.z-initialCalibrationz<=10) {
      Keyboard.release('w');
    }
    //////////////////////////////////////////////////////////////////////////////////////
  } else
  {Serial.println("currently turned off, send 'x' inyo the serial monitor to turn on");delay(2000); }

    ///////////////////////////// EXTERNAL ON OFF SWITCH FOR CIRCUIT PLAYGROUND ////////////////////////////
    // allows the arduino loop to be toggled off/on without having to touch the circuit playground by sending "x" into the serial monitor
    // also recalibrates the origin of the magnometer to the current facing direction when turned back on
    if (Serial.available() > 0) {  
      float key = Serial.read();    
      if (key==120){ // Check for key "x" being sent into the serial monitor
        on = !on; //flipflop bool
        if (on == true){
          Serial.print("starting arduino back up an recalibrating the magnometer");
          initialCalibrationx = event.magnetic.x;
          initialCalibrationy = event.magnetic.y;
          initialCalibrationz = event.magnetic.z;
        }
      }else{}

    delay(2);//quickly but not instantly iterate through serial monitor input
    Serial.println();

    }else{ // if nothing is sending into the monitor then do usual loop delay
    delay(200); 
    Serial.println();
    }
    //////////////////////////////////////////////////////////////////////////////////////////////////////

}
Schematic:


Team 10: Watermelon Controller

 Jessica Harrison and Chandler Crum


Controller:


Description:


For our project, we created a custom game controller for the game Suika Jelly using the Circuit Playground Express and a potentiometer. To play Suika Jelly, the player must strategically drop different fruits into a jar. Going into this project, we wanted to design a physical interface that helped the player feel more connected to the movement and placement of fruit. We decided to go with a watermelon slice because it is intuitive to hold and its half-circle shape can be manipulated almost like a steering wheel.

To use the controller, the player uses natural gestures that mirror actions that happen on the screen. Using tilt controls, the player can tilt the slice of watermelon left or right to trigger the “A” and “D” keys, positioning their fruit left or right in the game. Turning the potentiometer knob all the way to the right triggers the “space” key, dropping the fruit into place. If the potentiometer is all the way to the left, the “esc” key is triggered, pausing the game. After earning a certain amount of points, the game will enter “shake” mode. Usually, the player would use the WSAD keys to shake the jar up/down or left/right. Using our controller, the player can just shake the watermelon controller to trigger the “ctrl” key that enables shake mode, and continue moving it to shake the jar up/down or left/right.

The affordances of our controller are that the player can hold it how they normally would hold a slice of watermelon, and they can see that there is a knob on top that they can manipulate. A major signifier in our design is that the shape of the controller intuitively implies directional movement. The potentiometer only uses the highest and lowest value readings, so it’s not very easy to accidentally trigger the pause or shake menu. We used serial output to fine tune the input values.

Our controller creates a more immersive experience for Suika Jelly players, because most of the gestures, such as “shaking,” mimic exactly what is happening in-game. Our controller encourages movement and brings a new layer of fun that is concise with the game’s aesthetic and mechanics.

Questions:


1. What would be an interesting cover or replacement for the knob at the top of the controller?

2. Do you feel that this would be more immersive than using a traditional keyboard?


Schematics:


Code:


#include <Adafruit_CircuitPlayground.h>
#include <Keyboard.h>

const int slideSwitch = 7;  // Establish slide switch (D7)
const int potPin = A1;    // Potentiometer to A1
const int potRightMax = 900; // Potentiometer max right value
const int potLeftMax = 0;   // Potentiometer max left value

const float shakeMax = 10.0; // Shake sensitivity, can be adjusted if needed

void setup() {
  Serial.begin(9600); // Initialize serial monitor
  CircuitPlayground.begin(); // Initialize CPE
  pinMode(slideSwitch, INPUT_PULLUP); // Initialize on/off switch
  Keyboard.begin(); // Initialize keyboard
}

void loop() {
  bool switchState = digitalRead(slideSwitch) == LOW; // Check if switch is on/off

  if (switchState) { // If switch is on
    Serial.println("Board is online!"); // Print board status

    float x = CircuitPlayground.motionX(); // Read X-axis motion
    float y = CircuitPlayground.motionY(); // Read Y-axis motion
    float z = CircuitPlayground.motionZ(); // Read Z-axis motion

    Serial.print("X: "); // Print X-axis value
    Serial.println(x);
    Serial.print("Y: "); // Print Y-axis value
    Serial.println(y);
    Serial.print("Z: "); // Print Z-axis value
    Serial.println(z);

    float shakeValue = sqrt(x * x + y * y + z * z);  // Calculate motion values to detect if shaking
    if (shakeValue > shakeMax) { // If current shake value is above the maxium, is shaking
      Serial.println("Shaking!"); // Print when shaking
      Keyboard.press(KEY_LEFT_CTRL); // Press left-ctrl key
    } else { // No longer shaking
      Keyboard.release(KEY_LEFT_CTRL); // Release left-ctrl key
    }

    if (x < -3) {  // Check if tilting left
      Serial.println("Moving left!"); // Print when moving left
      Keyboard.press('a'); // Press a key
    }
    else if (x > 3) { // Check if tilting right
      Serial.println("Moving right!"); // Print when moving right
      Keyboard.press('d'); // Press d key
    }
    else { // Check if neutral position
      Serial.println("No movement!"); // Print when not moving
      Keyboard.release('a'); // Release a key
      Keyboard.release('d'); // Release d key
    }

    if (y < -3) { // Check if tilting up
      Serial.println("Moving up!"); // Print when moving up
      Keyboard.press('w'); // Press w key
    }

    else if (y > 3) { // Check if tilting down
      Serial.println("Moving down!"); // Print when moving down
      Keyboard.press('s'); // Press s key
    }

    else {  // If no axis thresholds are met
      Serial.println("No movement!"); // Print when not moving
      Keyboard.release('w'); // Release w key
      Keyboard.release('s'); // Release s key
    }

    int potValue = analogRead(potPin); // Read potentiometer value
    Serial.print("Potentiometer Value: "); // Print potentiometer value
    Serial.println(potValue);

    if (potValue > potRightMax) { // Drop fruit when turned fully right
      Serial.println("Dropped Fruit!"); // Print when fruit is dropped
      Keyboard.press(' '); // Press spacebar
    }
    else {
      Keyboard.release(' '); // Release spacebar
    }

    if (potValue == potLeftMax) { // Pause game when potentiometer at lowest value
      Serial.println("Paused!"); // Print when paused
      Keyboard.press(KEY_ESC); // Press escape key
    }
    else {
      Keyboard.release(KEY_ESC); // Release escape key
    }

  }
  else {
    Serial.println("Board is offline!"); // Print board status
    Keyboard.releaseAll(); // Release all keys
  }

  delay(50); // Delay for input stability
}


Demo:


Team 15's DigDug Controller

 By: Zoran Diaz and John Stalvey 


This controller is designed to put you right in the ground with your player character and navigate the ground using the iron you find in the ground. To do this, we made a box of iron filings that get triggered by four sensors. To move, simply rotate the controller in the direction you want to. By doing this, you'll move the filings up to the sensor, triggering the input.  Even if you don't understand how it works fully, the controller lures you into seeing the filings all loose in its container. By just moving it around a bit, you get immediate feedback by seeing your character move in the game. The WASD keys are used for filing movement, and when you're ready to attack en enemy, simply smack the controller. You'll hear the ground minerals quiver, as the ground shakes at your aggression to attack! All of this connects to the general theme of the game, with digging deep underground and trying to attack multiple enemies. The ground will move and shake as you defeat your enemies, and the controller does a good job immersing yourself in the games world. It truly feels like you're making your way around the deep ground, and visualize the attacks in the game. How do you think this could improve the gameplay experience of DigDug?

Both Zoran and John worked on the initial idea of the controller. Zoran figured out how it would roughly work, while John expanded upon it with more specific details. Zoran worked on the code, including getting the filing sensors working, and most of the electronic aspects of the controller. While I (John) worked with a fair amount of the electronics, my main focus was 3D modelling the controller and 3D printing it, making sure everything would fit. I also added other pieces to the controller to make it more complete.


#include <Adafruit_Circuit_Playground.h> #include <Adafruit_CircuitPlayground.h> #include <Keyboard.h> #define HALL_SENSOR_A1 A1 #define HALL_SENSOR_A7 A7 #define HALL_SENSOR_A6 A6 #define HALL_SENSOR_A4 A4 // Function declaration void handleKeyPress(bool condition, bool *state, int key, const char* keyName); // Key press state trackers bool leftPressed = false; bool upPressed = false; bool downPressed = false; bool rightPressed = false; bool xPressed = false; // x is the keybind for attacking const uint8_t TAP_THRESHOLD = 15; // Tap Detection Sensitivity; Lower numbers = more sensitive void setup() { Serial.begin(115200); CircuitPlayground.begin(); // Configure accelerometer CircuitPlayground.lis.setRange(LIS3DH_RANGE_2_G); CircuitPlayground.lis.setClick(2, TAP_THRESHOLD); // Double tap detection pinMode(HALL_SENSOR_A1, INPUT); pinMode(HALL_SENSOR_A7, INPUT); pinMode(HALL_SENSOR_A6, INPUT); pinMode(HALL_SENSOR_A4, INPUT); Keyboard.begin(); } void loop() { static unsigned long lastHallCheck = 0; const unsigned long hallInterval = 200; uint8_t click = CircuitPlayground.lis.getClick(); bool doubleTapDetected = (click & 0x20); // Check for double-tap handleKeyPress(doubleTapDetected, &xPressed, 'x', "X"); // Hall sensors if (millis() - lastHallCheck >= hallInterval) { lastHallCheck = millis(); int sensorValueA1 = analogRead(HALL_SENSOR_A1); int sensorValueA7 = analogRead(HALL_SENSOR_A7); int sensorValueA6 = analogRead(HALL_SENSOR_A6); int sensorValueA4 = analogRead(HALL_SENSOR_A4); handleKeyPress(sensorValueA1 < 235, &leftPressed, KEY_UP_ARROW, "Up"); handleKeyPress(sensorValueA7 < 235, &upPressed, KEY_RIGHT_ARROW, "Right"); handleKeyPress(sensorValueA6 > 4, &rightPressed, KEY_DOWN_ARROW, "Down"); handleKeyPress(sensorValueA4 < 220, &downPressed, KEY_LEFT_ARROW, "Left"); } delay(100); // How often sensor values are checked for inputting keyboard presses } // handleKeyPress functionality void handleKeyPress(bool condition, bool *state, int key, const char* keyName) { if (condition) { if (!*state) { Keyboard.press(key); Serial.print(keyName); Serial.println(" pressed"); *state = true; } } else { if (*state) { Keyboard.release(key); Serial.print(keyName); Serial.println(" released"); *state = false; } } }