27 November 2023

Game Controller: Kermit The Frogger

Images:

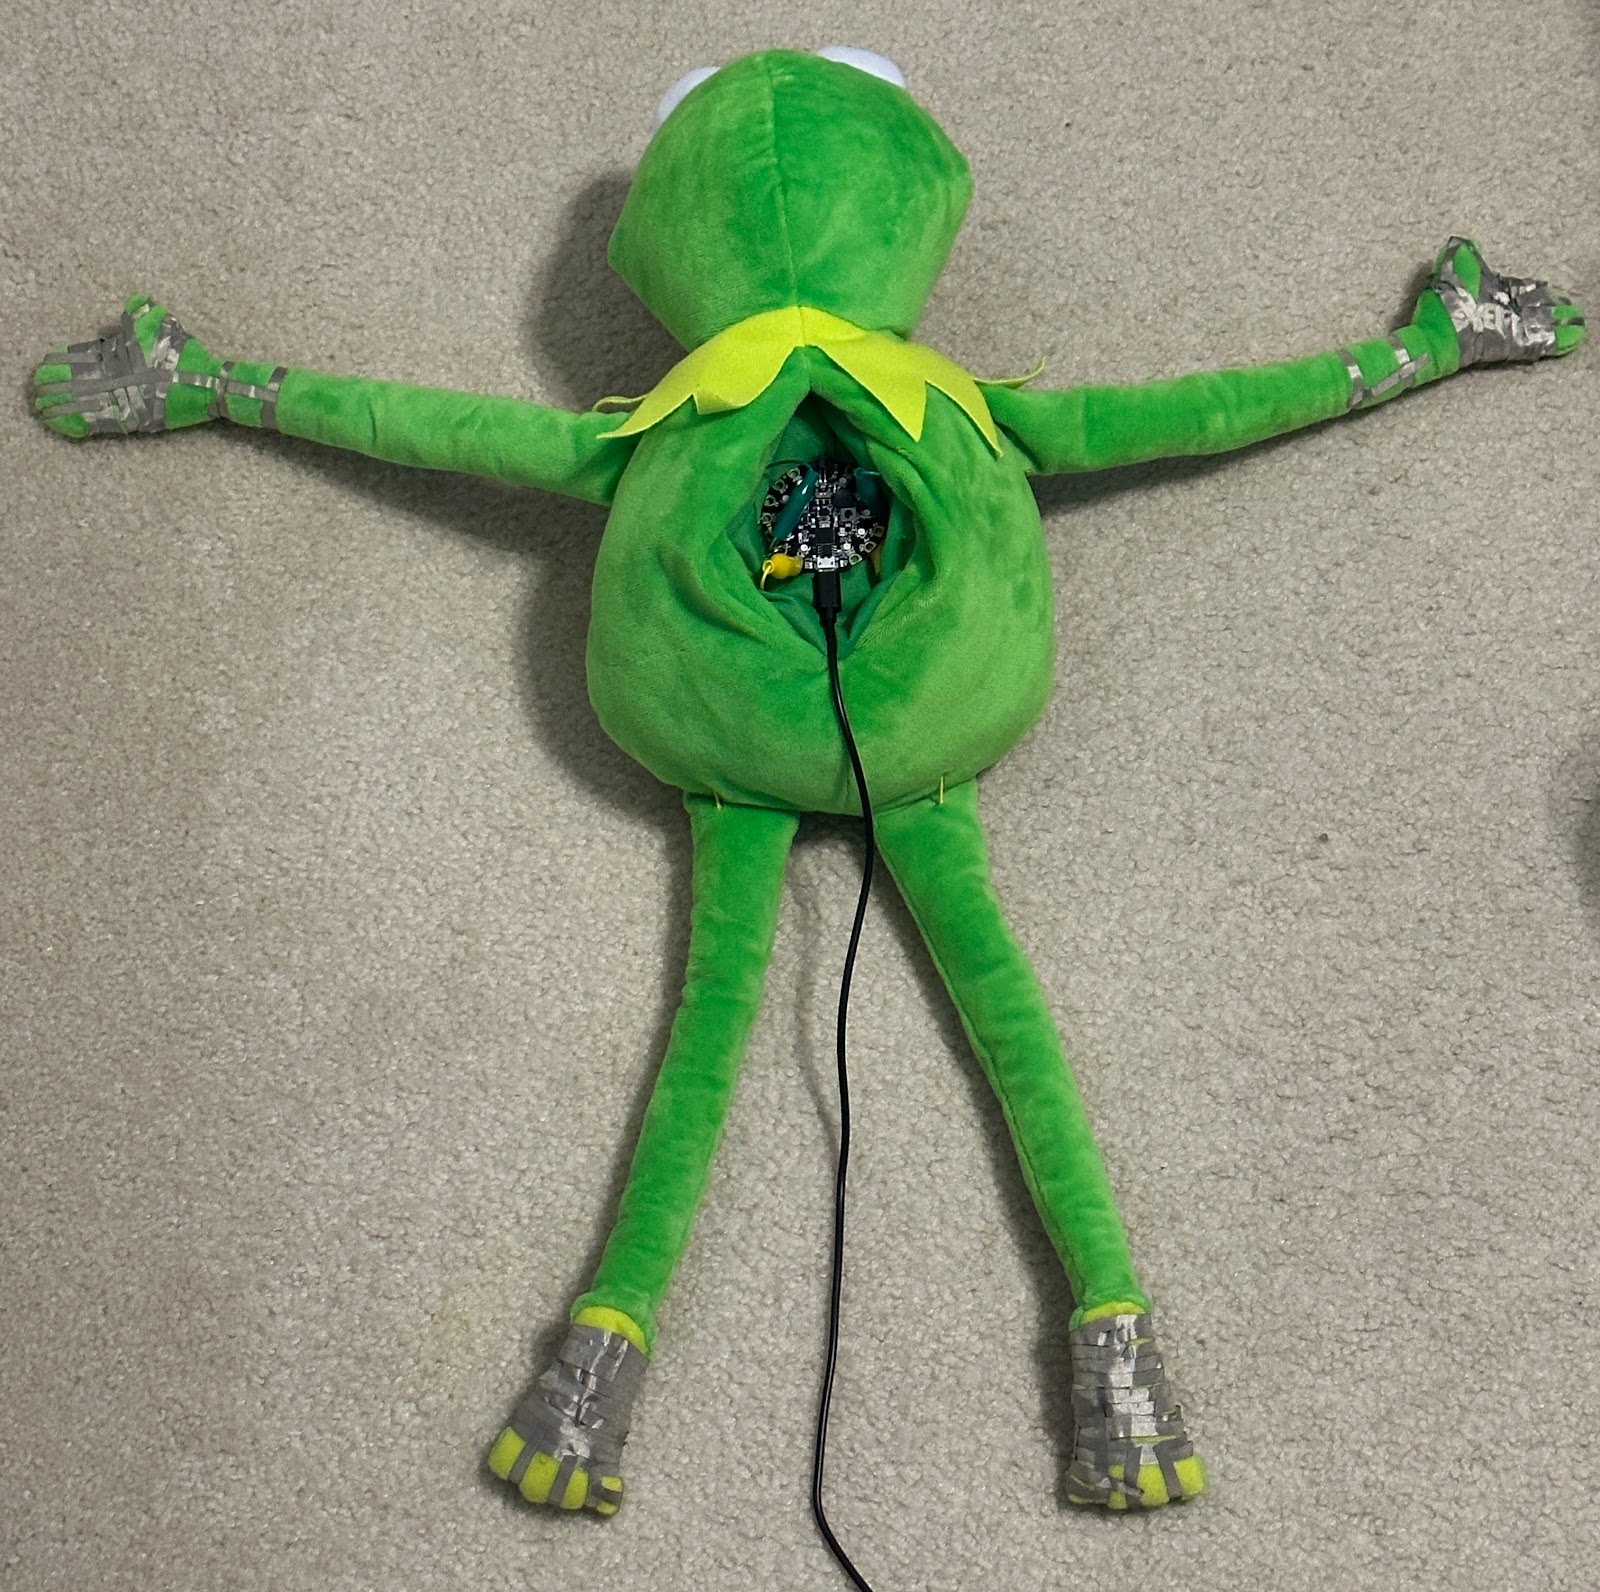
My game controller project is for Frogger. The idea of my controller is to have a physical representation of the frog that can be manipulated by the player to move in game. To do this, I used a Kermit the Frog plushie with the circuit playground inside, with wires going through the arms and legs that connect to conductive tape on the hands and feet. When the hands/feet are connected, current flows from the circuit playground through the arms/legs, back into the input, which completes the circuit and moves either forward or backward. The accelerometer in the playground is used to move left or right using motion controls. 

Some signifiers are the conductive tape pads on the hands and feet showing that they have a purpose. There is also barely visible wire at the shoulders and hips that are different colors, showing that the arms and legs are to be used separately for different functions. The feedback is shown when the player moves in Frogger, and it is designed to make sense directionally because tilting left and right moves left and right, touching front hands moves forward, touching back legs moves back. The motion controls are programmed to be used when the controller is face down, similar to the position the frog would be in game. The directional controls and matching the frog’s position to its in-game position are designed to make the controller easy to understand. 

How could I have incorporated more feedback within the controller to let the player know what they’re doing?

Schematic:


#include <Keyboard.h>
#include <KeyboardLayout.h>
#include <Keyboard_da_DK.h>
#include <Keyboard_de_DE.h>
#include <Keyboard_es_ES.h>
#include <Keyboard_fr_FR.h>
#include <Keyboard_it_IT.h>
#include <Keyboard_sv_SE.h>

#include <Adafruit_CircuitPlayground.h>
#include <Adafruit_Circuit_Playground.h>

char forward = KEY_UP_ARROW;
char back = KEY_DOWN_ARROW;
char left = KEY_LEFT_ARROW;
char right = KEY_RIGHT_ARROW;

int onForward = 0;
int onBack = 0;
int onLeft = 0;
int onRight = 0;

const int debounce = 50;

void setup() {
  CircuitPlayground.begin();
  pinMode(A3, INPUT_PULLUP);
  pinMode(A6, INPUT_PULLUP);

  Keyboard.begin();
  Serial.begin(9600);
  delay(1000);
}

void loop() {
  float move = CircuitPlayground.motionX();
  if (move > 4) {
    //move right
    if (onRight == 0) {
      Keyboard.write(right);
      onRight = 1;
    }
    delay(debounce);
  } else if (move < -4) {
    //move left
    if (onLeft == 0) {
      Keyboard.write(left);
      onLeft = 1;
    }
    delay(debounce);
  } else {
    onLeft = 0;
    onRight = 0;
    delay(debounce);
  }

  if (digitalRead(A3)) {
    //move forward
    if (onForward == 0) {
      Keyboard.write(forward);
      onForward = 1;
    }
    delay(debounce);
  }
  else if (digitalRead(A6)) {
    //move back
    if (onBack == 0) {
      Keyboard.write(back);
      onBack = 1;
    }
    delay(debounce);
  } else {
    onForward = 0;
    onBack = 0;
    delay(debounce);
  }
}
Video: 


Final Project: Cuphead Game Controller

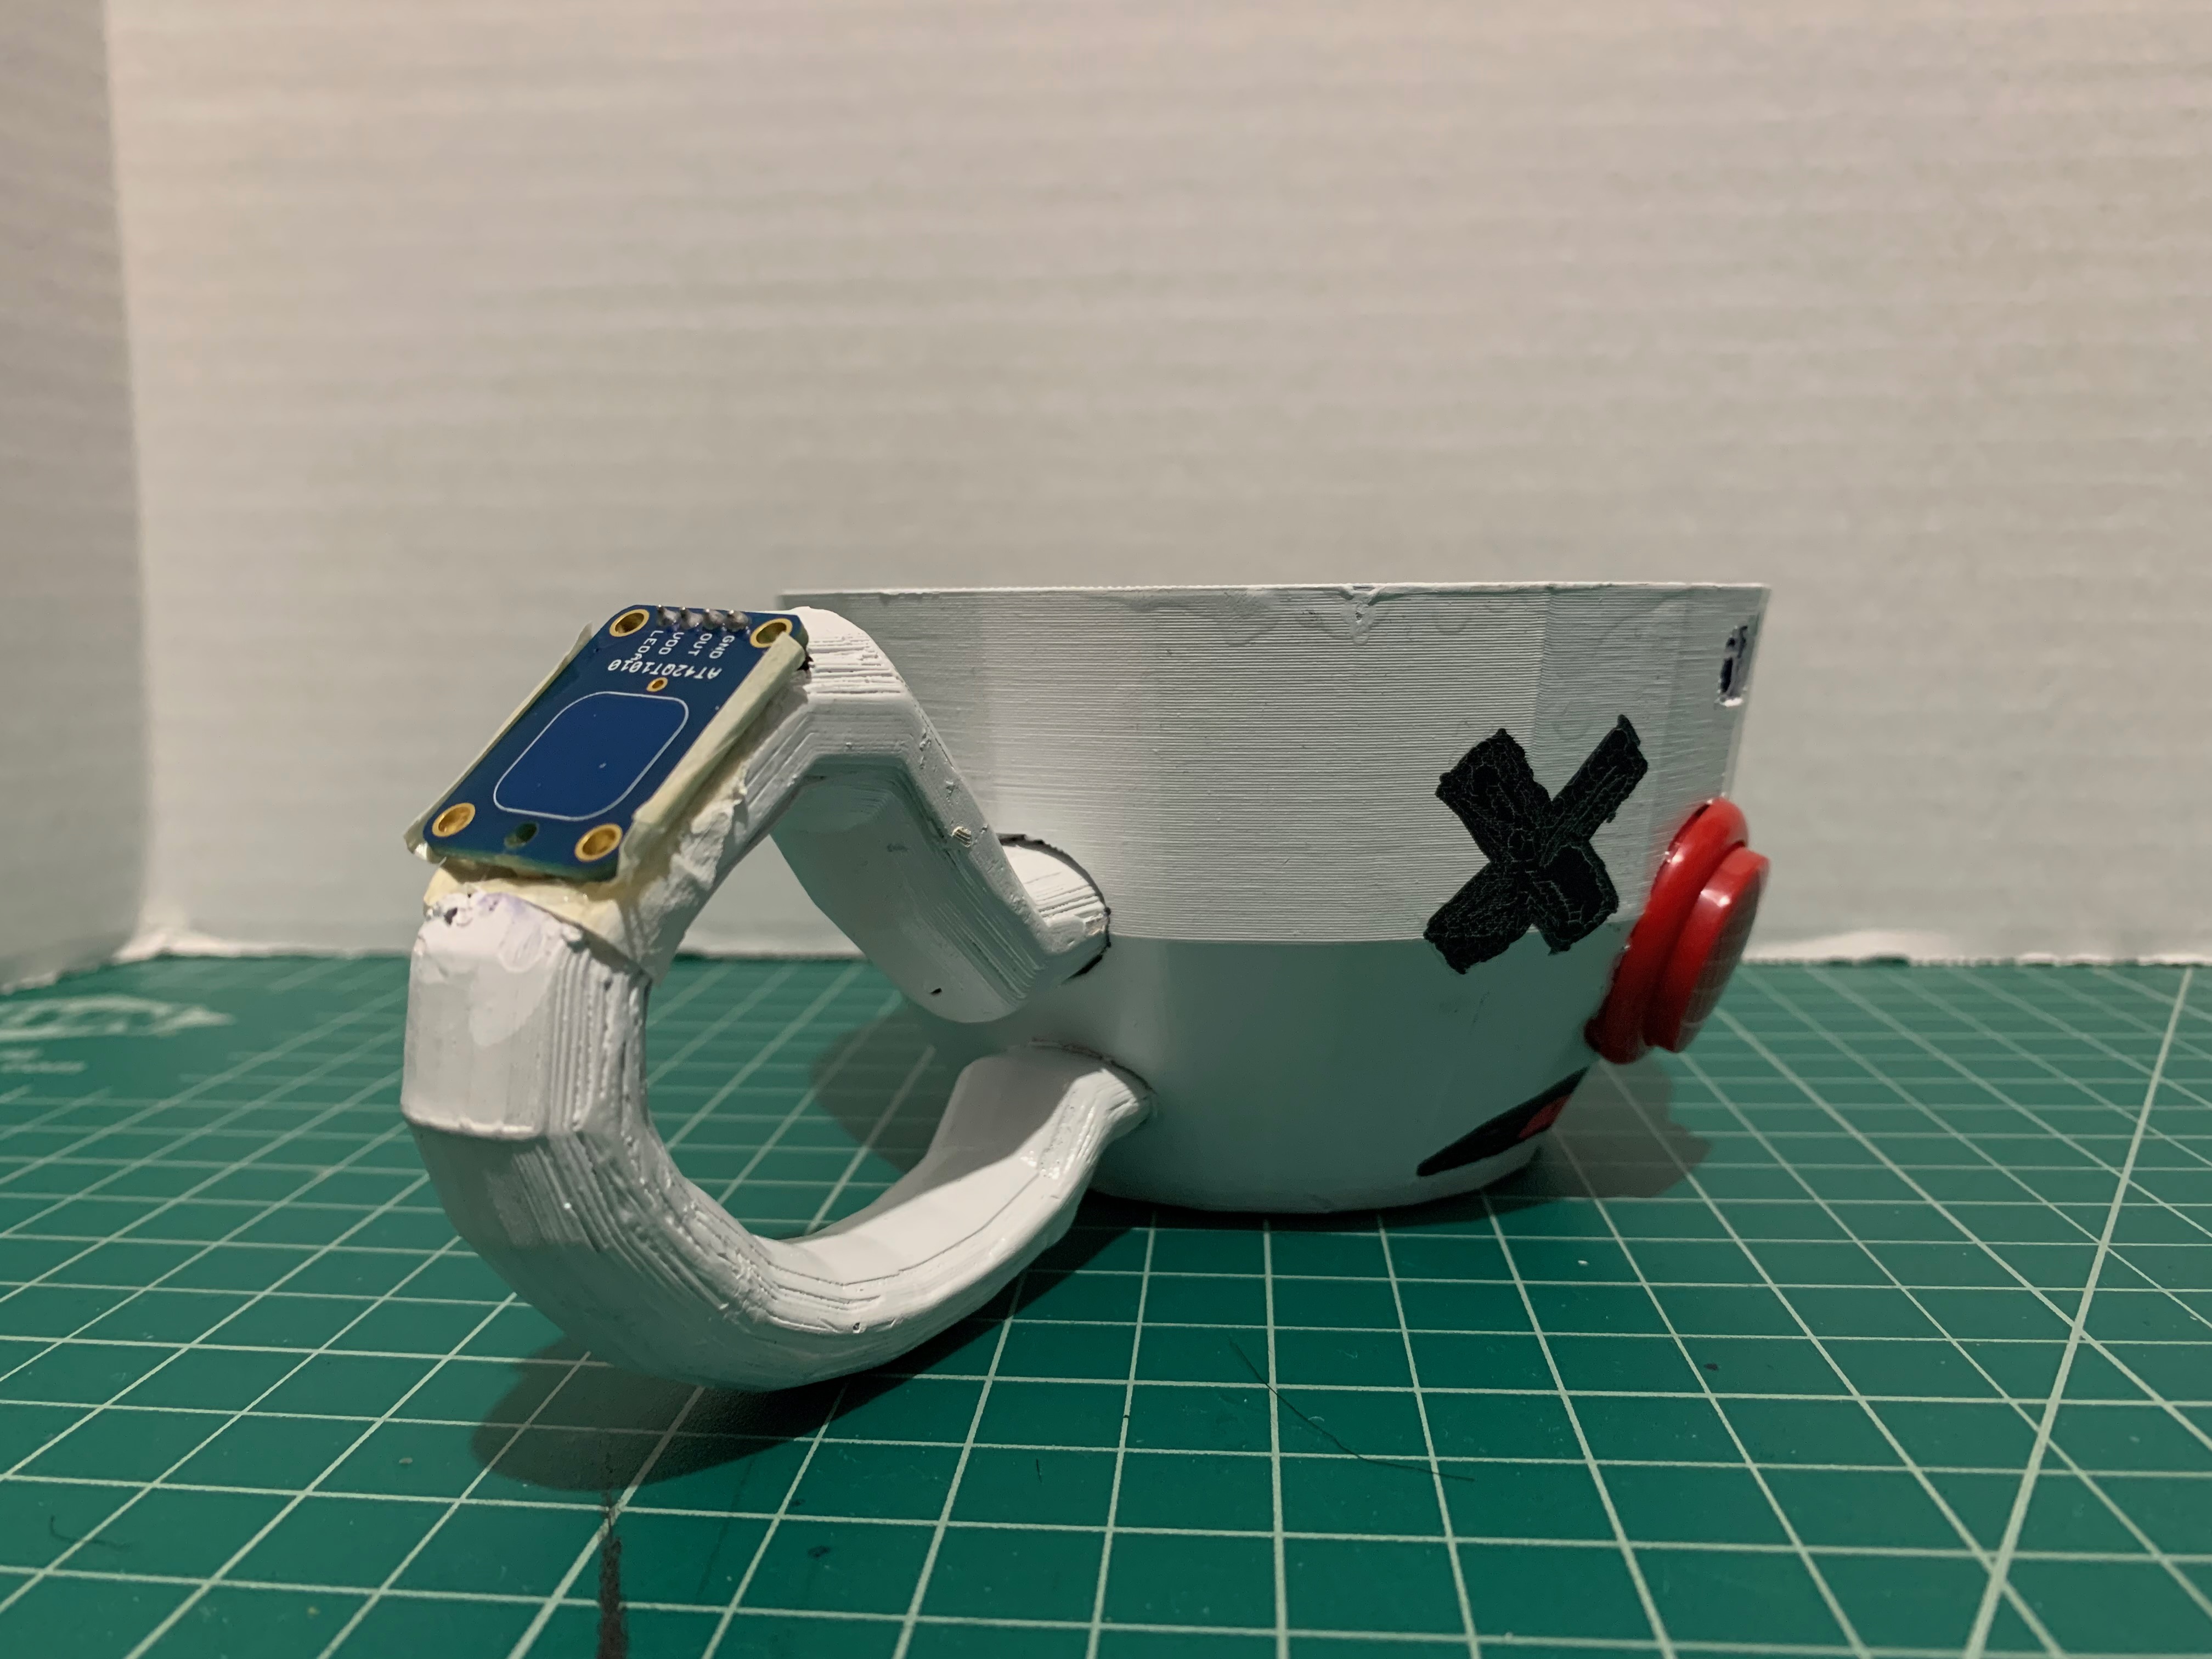
For this project, I decided to create a game controller for the game "Cuphead", a popular boss rush game inspired by 1920s cartoons. The point of the game is that you made an unintentional deal with the devil and now you must defeat bosses and collect their soul contracts to get out of the deal. 

Given this context, I wanted the controller to let players feel like they were the devil controlling the characters.  I designed the controller as a cup since the character has an actual cup as a head. I wanted the cup to have enough space for the required wiring and accessories, however, I did not consider the mount for the Adafruit circuit playground and had to think of other ways to attach it to the model. 


For the mechanics of my controller, the player would tilt the cup left, right, up, and down to move the character in the corresponding direction. The red nose button on the front would get the player to jump and parry. For shooting and dashing, I decided to use touch sensors. Originally, I wanted the player to scream into the Adafruit to shoot projectiles because I thought it would be a little funny. However, after some feedback, I realized that it would be very inconvenient to the player and was recommended to use the touch sensors. One on the handle for projectiles and easy gripping since the player will almost always be shooting at the boss. The touch sensor on the left of the controller is for dashing. If the player wants to stay in one place and shoot at a target, they can cover the light sensor on the Adafruit circuit to lock the character in place. There is a light that is close to the sensor that will go dark if the light sensor is covered enough. As the player shoots enemies and bosses, they charge up for special attacks that can be activated with the sound sensor. A simple snap of the figures is enough to activate it.


Schematics:


Question for the readers:

Question 1: The button on the front is used for jumping, but if I wanted to use a different accessory for jumping and parrying, what would you recommend?

Question 2: What are your most favorite and most hated bosses in Cuphead?


Video:

I asked a volunteer if they could do a few bosses with this controller to see the functionality of the controller.


Code:

#include <Keyboard.h>
#include <KeyboardLayout.h>
#include <Keyboard_da_DK.h>
#include <Keyboard_de_DE.h>
#include <Keyboard_es_ES.h>
#include <Keyboard_fr_FR.h>
#include <Keyboard_it_IT.h>
#include <Keyboard_sv_SE.h>

#include <Adafruit_CircuitPlayground.h>
#include <Adafruit_Circuit_Playground.h>

const int debounce = 1;
int direction;
int shoot;
int dash;
int sound = 0;
int light = 0;
int thresh = 400;
float value;


void setup()
{
// put your setup code here, to run once:
CircuitPlayground.begin();
pinMode(A1, INPUT_PULLUP); // button for jumping
pinMode(A2, INPUT_PULLUP);//touchsensor for shooting
pinMode(A5, INPUT_PULLUP);//touch sensor for dashing
pinMode(CPLAY_SOUNDSENSOR, INPUT);//sound sensor for special attacks
pinMode(CPLAY_LIGHTSENSOR, INPUT);// light sensor for locking

Keyboard.begin();
Serial.begin(9600);
delay(0);
}

void loop()
{
// put your main code here, to run repeatedly:
int t = CircuitPlayground.readCap(A2);
int d = CircuitPlayground.readCap(A5);
float x = CircuitPlayground.motionX();
float y = CircuitPlayground.motionY();
float light = CircuitPlayground.lightSensor();
float sound = CircuitPlayground.soundSensor();


if (x < -3)
{
Keyboard.press(KEY_RIGHT_ARROW);//move teh character right
delay(10);
Serial.print(direction); Serial.println("Right");
}
else
{
Keyboard.release(KEY_RIGHT_ARROW);
}


if(x > 3){
Keyboard.press(KEY_LEFT_ARROW);//moev the character left
delay(10);
Serial.print(direction); Serial.println("Left");
}
else
{
Keyboard.release(KEY_LEFT_ARROW);
}


if (y > 3)
{
Keyboard.press(KEY_UP_ARROW);//move the character up
delay(10);
Serial.print("direction: "); Serial.println("Up");
}
else
{
Keyboard.release(KEY_UP_ARROW);
}


if (y < -3)
{
Keyboard.press(KEY_DOWN_ARROW);//move the character down
delay(10);
Serial.print("direction: "); Serial.println("Down");
}
else
{
Keyboard.release(KEY_DOWN_ARROW);
}


if( ! digitalRead(A1) )//push the button to jump. push it again to parry
{
Keyboard.press('z');
Serial.print(direction); Serial.println("Jump");
delay(0);
}
else
{
Keyboard.release('z');
}


if (sound > 25) //speak into the adafruit to use special attacks
{
Keyboard.press('v');//special attack
int soundValue = digitalRead(sound);
value = CircuitPlayground.mic.soundPressureLevel(10);
Serial.print("Sound Level: ");
Serial.println(value);

}
else
{
Keyboard.release('v');
}


if (light < 15) //cover the cup to lock the character in place
{
Keyboard.press('c');//lock
int lightValue = digitalRead(light);
value = CircuitPlayground.lightSensor();
CircuitPlayground.setPixelColor(0, 0, 0, 0);//if the light sensor is covered, teh light will turn off.
Serial.print("Light Level: ");
Serial.println(value);
Serial.print(light); Serial.println("Lock");
}
else
{
Keyboard.release('c');
CircuitPlayground.setPixelColor(0, 0, 30, 0);
}


if(d < thresh) //cover the touch sensor on teh left to dash
{
Keyboard.press('d');
Serial.print(dash); Serial.println("Dash");
}
else
{
Keyboard.release('d');
}


if(t < thresh) //cover the touch sensor on the handle to shoot projectiles
{
Keyboard.press('x');
Serial.print(shoot); Serial.println("Shoot");
}
else
{
Keyboard.release('x');
}

Serial.println(t);
Serial.println(d);
delay(debounce);
//
//
}


Paperboy Controller


    This is the eventual design I came up with for my game controller for the classic NES game Paperboy. It’s fairly straightforward and emulates exactly what you would do if you were actually in the game. This is similar to the Wii and its controllers, as the motions you made with the Wii remote simulated what was happening on screen such as swinging a tennis racket or throwing a bowling ball. Since the game I chose was Paperboy, the design is made to be a pair of scooter or bicycle handlebars, with a bell on top that most bicycles also have. The Circuit Playground Express is connected to an Adafruit LSM9DS1 that is kept inside a box attached to the stem of the handlebars. The LSM9DS1 is constantly sending rotational data to the Circuit Playground through the gyro that is configured within it. It’s split up into the X, Y, and Z direction but for the purpose of my controller I’m only tracking the Y direction. These values are measured in floats and when the Y value of the gyro goes above or below a certain threshold it triggers a key press on the keyboard and makes the player in-game turn left or right. The sound sensor on the Circuit Playground is also used to detect whenever the bell on top of the handlebars is rung. This triggers a button press that makes the player in-game throw a newspaper. I think the theme of my controller matches the game I chose really well and it’s honestly very fun to use. One thing I would like to know is how I could make my controller more ascetically pleasing, because right now it’s a lot of black because I used duct tape to hold a lot of the pieces together.


#include <Wire.h>
#include <Adafruit_Sensor.h>
#include <Adafruit_LSM9DS1.h>

#include <Keyboard.h>
#include <KeyboardLayout.h>
#include <Keyboard_da_DK.h>
#include <Keyboard_de_DE.h>
#include <Keyboard_es_ES.h>
#include <Keyboard_fr_FR.h>
#include
<Keyboard_it_IT.h>
#include <Keyboard_sv_SE.h>

#include <Adafruit_CircuitPlayground.h>
#include <Adafruit_Circuit_Playground.h>

Adafruit_LSM9DS1 lsm = Adafruit_LSM9DS1();
#define LSM9DS1_SCK A5
#define LSM9DS1_MISO 12
#define LSM9DS1_MOSI A4
#define LSM9DS1_XGCS 6
#define LSM9DS1_MCS 5
//All of my libraries and a debounce
int debounce = 0;

void setupSensor()
{
  //This sets up the ranges and sensitivity of the LSM9DS1
  // 1.) Set the accelerometer range
  lsm.setupAccel(lsm.LSM9DS1_ACCELRANGE_2G);
  //lsm.setupAccel(lsm.LSM9DS1_ACCELRANGE_4G);
  //lsm.setupAccel(lsm.LSM9DS1_ACCELRANGE_8G);
  //lsm.setupAccel(lsm.LSM9DS1_ACCELRANGE_16G);
 
  // 2.) Set the magnetometer sensitivity
  lsm.setupMag(lsm.LSM9DS1_MAGGAIN_4GAUSS);
  //lsm.setupMag(lsm.LSM9DS1_MAGGAIN_8GAUSS);
  //lsm.setupMag(lsm.LSM9DS1_MAGGAIN_12GAUSS);
  //lsm.setupMag(lsm.LSM9DS1_MAGGAIN_16GAUSS);

  // 3.) Setup the gyroscope
  lsm.setupGyro(lsm.LSM9DS1_GYROSCALE_245DPS);
  //lsm.setupGyro(lsm.LSM9DS1_GYROSCALE_500DPS);
  //lsm.setupGyro(lsm.LSM9DS1_GYROSCALE_2000DPS);
}

void setup() {
  // put your setup code here, to run once:
  Serial.begin(9600);
  CircuitPlayground.begin();
  Keyboard.begin();
  pinMode(CPLAY_SLIDESWITCHPIN, INPUT_PULLUP);
  setupSensor();
  delay(100);
}

void loop() {
  lsm.read();

  sensors_event_t a, m, g, temp;
  lsm.getEvent(&a, &m, &g, &temp);
  float soundLevel = CircuitPlayground.mic.soundPressureLevel(10);

  Serial.print("Accel X: "); Serial.print(a.acceleration.x); Serial.print(" m/s^2");
  Serial.print("\tY: "); Serial.print(a.acceleration.y);     Serial.print(" m/s^2 ");
  Serial.print("\tZ: "); Serial.print(a.acceleration.z);     Serial.println(" m/s^2 ");

  Serial.print("Mag X: "); Serial.print(m.magnetic.x);   Serial.print(" uT");
  Serial.print("\tY: "); Serial.print(m.magnetic.y);     Serial.print(" uT");
  Serial.print("\tZ: "); Serial.print(m.magnetic.z);     Serial.println(" uT");

  Serial.print("Gyro X: "); Serial.print(g.gyro.x);   Serial.print(" rad/s");
  Serial.print("\tY: "); Serial.print(g.gyro.y);      Serial.print(" rad/s");
  Serial.print("\tZ: "); Serial.print(g.gyro.z);      Serial.println(" rad/s");
  //The code above reads out all of the raw values for the accelerometer, gyro, and magnetometer in the serial monitor
  Serial.println();
  delay(100);

  // put your main code here, to run repeatedly:

  //Makes sure the circuit playground is switched on before you start playing

  if(digitalRead(CPLAY_SLIDESWITCHPIN))
  {
    //The two if statements below detect the gyro values as floats and turn the bicycle left and right by in game by pressing arrow keys when a certain threshold is reached
    //Also makes sure to release the keys when the handles are not turned in a direction
    if (g.gyro.y >= 30)
    {
      Keyboard.press(KEY_RIGHT_ARROW);
      Serial.println("Right Key Pressed");
      delay(debounce);
    }
    else
    {
      Keyboard.releaseAll();
    }
    if (g.gyro.y <= -30)
    {
      Keyboard.press(KEY_LEFT_ARROW);
      Serial.println("Left Key Pressed");
      delay(debounce);
    }
    else
    {
      Keyboard.releaseAll();
    }
    //This detects sound whenever the player rings a bell which makes the character throw a paper in game
    if(soundLevel >= 75)
    {
      Keyboard.press('X');
      Serial.println("X pressed");
      delay(debounce);
    }
    else
    {
      Keyboard.releaseAll();
    }
  }
}


LIMBO Game Controller


I chose to create a game controller for Limbo, developed by Playdead. The conceptual model draws inspiration from one of the NPCs in the game, the "maggot eater." These helpful characters spawn with three heads that are almost constantly chomping and help the player by eating the mind controlling maggots that get stuck on their head. The controller has five inputs and outputs. The leftmost head can be swiveled to control vertical movement (up and down), while the rightmost head can be swiveled to control horizontal movement (left and right). To mirror some of the in-game behavior, the mouth on the leftmost head can be opened and closed to hold and pull or push items in the game. Input is mostly prompted by the springs, which suggest that there is some interactable mechanism attached to the model. Some of the most prominent forms of feedback that this controller gives to the player is the sounds of the mouths opening and closing, and sounds associated with swiveling each head. Overall, the controller is very monotone and challenges the user to quickly switch between different inputs which maps perfectly onto Limbo's monochromatic atmosphere and unforgiving gameplay. How could I improve the controller's signifiers and feedback?

Circuit:


Code:

#include <Keyboard.h>

#include <KeyboardLayout.h>

#include <Keyboard_da_DK.h>

#include <Keyboard_de_DE.h>

#include <Keyboard_es_ES.h>

#include <Keyboard_fr_FR.h>

#include <Keyboard_it_IT.h>

#include <Keyboard_sv_SE.h>


#include <Adafruit_CircuitPlayground.h>

#include <Adafruit_Circuit_Playground.h>


int inputThreshold = 3;

bool firstLoop = false;

int defaultLightValue = 0;


// boolean for if player was pressing left ctrl before (wasControlling)


void setup() {

  // put your setup code here, to run once:

  CircuitPlayground.begin();  // begin Circuit Playground

  firstLoop = false;          // reset boolean for getting default light value in play environment

  Keyboard.begin();           // begin Keyboard library

  Serial.begin(9600);         // begin Serial for debug

  delay(100);

}


void loop() {

  // put your main code here, to run repeatedly:


  int inputX = map(analogRead(A3), 0, 1023, -inputThreshold, inputThreshold);

  int inputY = map(analogRead(A6), 0, 1023, -inputThreshold, inputThreshold);

  int inputLight = map(analogRead(A7), 0, 1023, -6, 6);  // map later if necessary


  Serial.println(inputLight);

  // read value from right potentiometer


  // if value is greater than 0, "press" the right arrow key

  if (inputX > 0) {

    Keyboard.press(KEY_RIGHT_ARROW);

  }

  // if value is equal to 0, "relase" both left and right arrow keys and return

  if (inputX == 0) {

    Keyboard.release(KEY_RIGHT_ARROW);

    Keyboard.release(KEY_LEFT_ARROW);

  }

  // if value is less than 0, "press" the left arrow key

  if (inputX < 0) {

    Keyboard.press(KEY_LEFT_ARROW);

  }


  // read value from left potentiometer


  // if value is greater than 0, "press" the up arrow key

  if (inputY > 0) {

    Keyboard.press(KEY_UP_ARROW);

  }

  // if value is equal to 0, "release" the up and down arrow keys and return

  if (inputY == 0) {

    Keyboard.release(KEY_UP_ARROW);

    Keyboard.release(KEY_DOWN_ARROW);

  }

  // if value is less than 0, "press" the down arrow key

  if (inputY < 0) {

    Keyboard.press(KEY_DOWN_ARROW);

  }


  // read value from photoresistor


 // if value is greater than default reading, "press" the left ctrl key

  if (inputLight > 2) {

    Keyboard.press(KEY_LEFT_CTRL);

  }

  // if value is less than default reading, "release" the left ctrl key if it was pressed before

  if (inputLight < 5) {

    Keyboard.release(KEY_LEFT_CTRL);

  }

}

Video: 


FINAL FANTASY VII Controller - Joseph Donnelly

 Controller:


Video:


    So, for my final controller, it ended up being a failure. This is primarily just due to the fact that I was completely unable to get an external sensor working, which then resulted in me not even bothering to make a good quality external for the controller, and just using a cardboard tube. That being said, there are still design elements in place here. The tube and circle at the bottom are supposed to be reminiscent of a sword hilt, evocative of the Buster Sword from the game I chose. For the mapping for the inputs, the way that the device is tilted impacts the way the character or menu input moves, while shouting or making an otherwise loud noise presses the confirm button. To cancel, the user swings the sword, like they are attacking the choice they were going to make. Initially, this was reversed, but since swinging the hilt is a more vague input, I decided to swap the two. As for the signifiers, there aren't too many, to be honest. The only input that is slightly hinted at by the shape of the controller is that of swinging it, and even that isn't hinted at too strongly. Feedback, meanwhile, is given by the game itself. Thus, movement and cancelling are rather easy to intuit. The only input that isn't easy to intuit is that of confirming, which must be explained beforehand. The main question I have about the base concept of my controller is this: in what way could I have signified the idea of shouting to confirm?

Schematics:


https://blogger.googleusercontent.com/img/b/R29vZ2xl/AVvXsEgIOnaUdIKYblMcfMxUcE7IEVBmhHwXi6hfrf6msf-1DiI-lf2uBpv72k5-NkWsoGb1yQZChV_4Q8c3fSEwYPdEMZ9lwxhCat0WXkmkqWXRe7sS5V9a_3bxxnMcRAS5vTiODSH-h2mQY4V6ooqgzhjkxgftZ1UYA2lNsu3oa-fjLYZVIoYBQ6rV15JB27k/s496/accel.png

https://blogger.googleusercontent.com/img/b/R29vZ2xl/AVvXsEh8rV5AqYb56ljeDiAuiwMuP9_tpqABq1e8qdStXPubKyLfo9Lf-ILSZTAgdyhSXn3MkMrTWrUdyr7ztPDU9r3H__6wucPkG8K9tSBQ9bmlJkkJhvY_jdKRs52jW7OycKD29tzK3p_V0P0fks9omfx9cpTKgvlRANvPmx2-80yaggfGfbrKU_0MOvaMWQM/s700/circuit.pnghttps://blogger.googleusercontent.com/img/b/R29vZ2xl/AVvXsEgDP_ACKxQSGshfxd17H3RhGXxYfMUu_mCzXWnr6A7eosmRoHdQPLu1MmGThfXJqPTSKruoi6FML2cBoNm_74xNHwxmrIfjBb9kEnMw1ku4aTsnC4gIOWTFYWeF0WfL-QQmqn0HXeF0ugtjlIIyD6p-58jgQjh3zjVCNyIH_58bUrP0AYeaQC9fHFG-0sI/s450/sound.png

Code:

#include <Keyboard.h>
#include <KeyboardLayout.h>
#include <Adafruit_CircuitPlayground.h>
#include <Adafruit_Circuit_Playground.h>

int swatch = 0;
int pulse = 0;
void setup() {
// put your setup code here, to run once:
Serial.begin(9600);
pinMode(CPLAY_SLIDESWITCHPIN, INPUT);
pinMode(A2, OUTPUT);
pinMode(A1, INPUT);
delay(1000);
Keyboard.begin();
CircuitPlayground.begin();
}

void loop() {
// put your main code here, to run repeatedly:
swatch = digitalRead(CPLAY_SLIDESWITCHPIN);
if (swatch == 1){
float x = CircuitPlayground.motionX();
float y = CircuitPlayground.motionY();
float z = CircuitPlayground.motionZ();
float m = CircuitPlayground.mic.soundPressureLevel(10);
Serial.print("Z Level = ");
Serial.println(z);
if (z < 12 && z > -2){
if (y > 4){
Keyboard.press(KEY_DOWN_ARROW);
}
if (y < -4){
Keyboard.press(KEY_UP_ARROW);
}
if (x > 4){
Keyboard.press(KEY_LEFT_ARROW);
}
if (x < -4){
Keyboard.press(KEY_RIGHT_ARROW);
}
}
if(m > 85){
Keyboard.press('x');
}
else if(z > 12 || z < -2){
Keyboard.press('c');
}
if ( x < 4 && x > -4 && y < 4 && y > -4 && z < 12 && z > -2 && m < 85){
Keyboard.releaseAll();
}
}
}

Project: The Sonic Spinball Mini Pinball Machine Controller


                                                    Photo of Sonic Spinball Controller


    Hello everyone, this is Kyle Amburgey here with the final build of my custom game controller: The Sonic Spinball Mini Pinball Machine. My idea for this controller was for a mini pinball machine as the game that I was designing it to work with, Sonic Spinball, is a Sonic The Hedgehog spinoff game with pinball-style gameplay and I've always wondered what it would be like to play it like an actual pinball machine, instead of with just regular buttons. The controller consists of two photocells used for moving left and right, and two mini toggle switches used for the pinball flippers and jumping.

    Starting with mappings, there are only three major controls I needed to consider when designing my project: moving, jumping, and flipping bumpers. To move Sonic left or right the player must tilt the controller to cause a small marble within the controller to cover one of the photocells within the center chamber of the controller, an action signified by the presence of two photocells within the middle of the controller and a marble that can be moved to cover them. To control the left and right flippers all the player needs to do is toggle the left and right toggle switches, respectively; this action also causes Sonic to jump, an action originally mapped to a third photocell that unfortunately stopped working after I finished building the controller.

    Moving on to my controller's conceptual model, the concept behind it is quite literal as it is just a mini pinball machine, so the mappings for the controller mimic the actions a player might perform on a full-sized pinball machine. Tilting the controller to move is just like when players tilt a pinball machine to move the pinball in a desired direction, an action considered cheating, however it is necessary in the dangerous pinball world Sonic finds himself in within Sonic Spinball. Flipping the toggle switches to flip the pinball flippers is just like controlling flippers on an actual machine, and one may see this act as making the pinball jump, making my mapping of the jump button to these switches an appropriate one conceptually.

    I would like to end off with a question about my controller: is there a better way I could have mapped movement?


Schematic


// Code written by Kyle Amburgey, 2023

// CPE library
#include <Adafruit_CircuitPlayground.h>
#include <Adafruit_Circuit_Playground.h>

// Keyboard library
#include <Keyboard.h>
#include <KeyboardLayout.h>
#include <Keyboard_da_DK.h>
#include <Keyboard_de_DE.h>
#include <Keyboard_es_ES.h>
#include <Keyboard_fr_FR.h>
#include <Keyboard_it_IT.h>
#include <Keyboard_sv_SE.h>

// Define pins for all three external light sensors
int photocell0 = A7;
int photocell1 = A1;
int photocell2 = A0;

// Analog readings from photocells
int photocellReading0;
int photocellReading1;
int photocellReading2;

// Define pins for both mini toggle switches
int toggleswitch0 = A5;
int toggleswitch1 = A2;

// Debounce time of 10 milliseconds
const int debounce = 10;

void setup() {
  //Opens CPE serial port
  Serial.begin(9600);
  // Initiates switch pins
  pinMode(toggleswitch0, INPUT);
  pinMode(toggleswitch1, INPUT);
  // Initiates photocell pins
  pinMode(photocell0, INPUT);
  pinMode(photocell1, INPUT);
  pinMode(photocell2, INPUT);
  // Initiates CPE
  CircuitPlayground.begin();
  // Enables keyboard controls
  Keyboard.begin();
  // Delay of 1 second before looping
  delay(1000);
}

void loop() {
  // Photocell testing
  photocellReading0 = analogRead(photocell0);
  photocellReading1 = analogRead(photocell1);
  photocellReading2 = analogRead(photocell2);

  // If photocell0 is covered, then press and hold 'left arrow' key
  if(photocellReading0 >= 185) {
    // Release 'left arrow' key
    Keyboard.release(KEY_LEFT_ARROW);
    delay(debounce);
  } else {
    // Press and hold 'left arrow' key
    Keyboard.press(KEY_LEFT_ARROW);
    // Debounce for photocell
    delay(debounce);
  }

  // If photocell1 is covered, then press and hold 'right arrow' key
  if(photocellReading1 >= 300) {
    // Release 'right arrow' key
    Keyboard.release(KEY_RIGHT_ARROW);
    // Debounce for photocell
    delay(debounce);
  } else {
    // Press and hold 'right arrow' key
    Keyboard.press(KEY_RIGHT_ARROW);
    // Debounce for photocell
    delay(debounce);
  }

  /* ** Scrapped code for the third photocell that was **
  originally mapped to press both flippers at once and jump;
  this component unfortunately broke at some point after
  placing my circuit into the final controller case. */
    /* If photocell2 is covered, then press and hold 'c'
    (both flippers / jump),then delay for 1 second */
      /*if(photocellReading2 >= 169) {
        Keyboard.release('z');
        delay(debounce);
      } else {
        // Press and hold 'z' key
        Keyboard.press('z');
        // Debounce for photocell
        delay(debounce);
      }
      */
 
  /* If toggleswitch0 is switched on, then press and hold
  'x' and then press 'z' (right flipper control then jump). */
  if(analogRead(toggleswitch1) < 300) {
    // Release 'x' key
    Keyboard.release('x');
    // Debounce for switch
    delay(debounce);
  } else if(analogRead(toggleswitch1) > 400) {
    // Press and hold 'x' key
    Keyboard.press('x');
    // Press 'z' to jump
    Keyboard.write('z');
    // Debounce for switch
    delay(debounce);
  }

  /* If toggleswitch1 is switched on, then press and hold 's'
  and then press 'z' (left flipper control then jump). */
  if(analogRead(toggleswitch0) > 400) {
    // Release 's' key
    Keyboard.release('s');
    // Debounce for switch
    delay(debounce);
  } else if(analogRead(toggleswitch0) < 300) {
    // Press and hold 's' key
    Keyboard.press('s');
    // Press 'z' to jump
    Keyboard.write('z');
    // Debounce for switch
    delay(debounce);
  }

  // **Code for testing component readings within the serial monitor**
    // Debug code for photocells
      //Serial.print(photocellReading0);
        //Serial.print("\t");
      //Serial.print(photocellReading1);
        //Serial.print("\t");
      //Serial.print(photocellReading2);
        //Serial.print("\t");
    // Debug code for switches
      //Serial.println(analogRead(A5));
        //Serial.print("\t");
      //Serial.println(analogRead(A2));
        //Serial.print("\t");

}

                                                                     Arduino code 


                                           https://www.youtube.com/watch?v=8iJ7W54ORts


Tapper Final Controller


Description

My project for the final game controller is about Tapper. The basis of my model is to be inspired by a beer keg. I created this controller because it simulates getting beer into a cup to make you feel like a bartender. The lever is like a nozzle, when pulled down it acts as the space bar which pours the beer in the game. The ultrasonic range sensor is on the left of the controller. Its purpose is to make the player go left when their hand is a certain distance away and stay put when their hand is close to the sensor. On the right, there is the potentiometer that controls the up and down movements, when it's turned to the right the player goes right, and when it turns to the left the player goes down. I wanted the controller to make the player feel immersed in the game. To me, Tapper was a game that was supposed to make you stressed so I didn't want to make the controller feel like it made it more difficult, instead I wanted the controls to feel almost natural so anyone can play it without thinking too hard about it. My question is, is this design a good design does it make sense when you look at it and are there any improvements that could have made it more interesting?

Schemactics


Code

#include <Keyboard.h>
#include <KeyboardLayout.h>
#include <Keyboard_da_DK.h>
#include <Keyboard_de_DE.h>
#include <Keyboard_es_ES.h>
#include <Keyboard_fr_FR.h>
#include <Keyboard_it_IT.h>
#include <Keyboard_sv_SE.h>

#include <Adafruit_CircuitPlayground.h>
#include <Adafruit_Circuit_Playground.h>

#define trigpin 9
#define echoPin 6
#define led 13

// Define a threshold for potentiometer value change
const int hysteresis = 45;

// Variable to store the previous potentiometer value
int previousValue = 0;

void setup() {
  // put your setup code here, to run once:
  CircuitPlayground.begin();
  Keyboard.begin();
  Serial.begin(9600);
  pinMode(trigpin, OUTPUT);
  pinMode(echoPin, INPUT);
  pinMode(led, OUTPUT);
}

void loop() {
  // put your main code here, to run repeatedly:
  //Accelometer
  float x = CircuitPlayground.motionX();
  if (x < 1) {
    Keyboard.press(' ');
    Serial.print(x);
    Serial.println(" Accelometer");
    delay(300);
  } else {
    Keyboard.release(' ');
  }
  Serial.print(x);
  Serial.println(" Accelometer");

  //ultrasonic range sensor:
  long duration, distance;

  digitalWrite(trigpin, LOW);
  delayMicroseconds(2);
  digitalWrite(trigpin, HIGH);
  delayMicroseconds(10);
  digitalWrite(trigpin, LOW);
  duration = pulseIn(echoPin, HIGH);
  distance = (duration / 2) / 29.1;
  if (distance < 10) {
    digitalWrite(led, HIGH);

  } else {
    digitalWrite(led, LOW);
  }

  if (distance >= 400 || distance <= 0) {
    Serial.println("Out of range");


  } else {
    Serial.print(distance);
    Serial.println(" cm");
  }
  delay(500);

  if (distance <= 11) {
    Keyboard.press(KEY_RIGHT_ARROW);
  } else {
    Keyboard.write(KEY_LEFT_ARROW);
  }


  //Add loop for Potientometer
  // Read the current potentiometer value
  int potValue = analogRead(A5);  // Adjust the pin as needed

  // Check for a significant change in potentiometer value
  if (abs(potValue - previousValue) > hysteresis) {
    if (potValue > previousValue) {
      // Code for increasing value
      Keyboard.write(KEY_UP_ARROW);  // Simulate pressing the up arrow key
      delay(300);
      Keyboard.release(KEY_UP_ARROW);  // Release the up arrow key
      Serial.println("Potentiometer position increased.");
    } else if (potValue < previousValue) {
      // Code for decreasing value
      Keyboard.write(KEY_DOWN_ARROW);  // Simulate pressing the down arrow key
      delay(300);
      Keyboard.release(KEY_DOWN_ARROW);  // Release the down arrow key
      Serial.println("Potentiometer position decreased.");
    }

    // Update the previous value for the next loop iteration
    previousValue = potValue;
    Serial.print("Pre ");
    Serial.println(previousValue);
  } else {
    Serial.println("Potentiometer position unchanged.");
  }

  // Print the current potentiometer value
  Serial.print("Pot ");
  Serial.println(potValue);
}

Video