14 March 2021

NIME: Interrupting Music Box


This music box interrupts itself a lot.


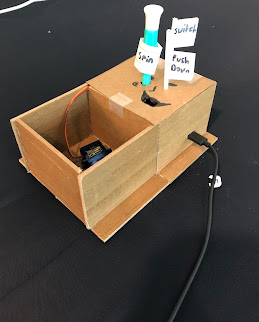
Essentially, my idea for the project came as a series of interruptions, which in turn led me to want to create an interruptive music box. That is an intentional quality of this device. Essentially, it is mapped to accept input from both the right and left button on the circuit playground express, as well as accept input from the potentiometer. When a button is pressed, it overrides any other input. 


This project works through the use of two buttons, and by turning the potentiometer. Every single interaction with this project interrupts another aspect. When music is played, the servo will stop moving. Alternatively, pressing down on the right button will allow for a moment of escape from the music box’s clicking. The servo will remain paused for as long as the user holds down the right button. In regard to the potentiometer, when turned, the servo will interrupt its own spin cycle and go in an alternate direction. There is some indication drawn onto the box to let the user know what might happen based on interaction; however, the feedback is only apparent through an aggressive change in what is happening. 


This device is not so much a music box, as an annoying single person game. In some ways, I can see a similarity to an omnophone. 


I suppose the biggest question I have is how could I have improved the aesthetics to better depict my intention?


/*
 * NIME, Music Box
 * Melissa Wells
 */

#include <Adafruit_CircuitPlayground.h>
#include <Adafruit_Circuit_Playground.h>
#include <Servo.h>

//variables 
//Servo
Servo myServo;
int pos = 0; // actual Servo position
int inc = 1; // represents the condition the servo is in with 0 or 1

//potentiometer
const int potent = A1; //where potent connected
const int valueThreshold = 500;

int sensorValue = 0; //value read from potent
int mappedPotent = 0;


//is song playing
bool song = false; 

void setup() {
  // put your setup code here, to run once:
  Serial.begin(9600);
  CircuitPlayground.begin();
  
  //Servo Stuff
  delay (1000);
  myServo.attach(10); //10 = A3
  pinMode(13, OUTPUT);
  pinMode(4, INPUT_PULLDOWN);


}

void loop() {
    
  // put your main code here, to run repeatedly:

  //if you press the left button, start the song
  if(CircuitPlayground.leftButton()) {   // if reading the left button returns true
    song = true;
    PlaySong();
  }
  
  //if you hold down the right button, interrupt Servo's percussion
  else if(CircuitPlayground.rightButton()) { // if reading the right button returns true
    if (pos == 0) inc = 1;
    if (pos == 180) inc = -1;
    myServo.write (pos);
    pos += inc;
    delay(sensorValue);
    //delay(15);
    digitalWrite(13, digitalRead(4)); 
  } 

//control which direction the Servo moves in based on potentiometer
  sensorValue = analogRead(potent);
  if (sensorValue > valueThreshold)
  {
    myServo.write(90); }
    else
    {myServo.write(0);}

}  

void PlaySong()
{
  if (song == true)
  {
    CircuitPlayground.playTone(800,400);
    CircuitPlayground.playTone(700,200);
    CircuitPlayground.playTone(600,200);
    CircuitPlayground.playTone(800,100);
    CircuitPlayground.playTone(600,200);
    CircuitPlayground.playTone(800,400);
    CircuitPlayground.playTone(700,100);
    delay(200);
    CircuitPlayground.playTone(800,400);
    CircuitPlayground.playTone(700,200);
    CircuitPlayground.playTone(600,200);
    CircuitPlayground.playTone(800,100);
    CircuitPlayground.playTone(600,200);
    CircuitPlayground.playTone(800,400);
    CircuitPlayground.playTone(700,100);
  }

  song = false;
}


Project: NIME


Heya all, so this is my little soundbox meant to prove a constant source of acoustic noise while the user can freely adjust and dial in a digital tone. Within the box, there is a servo motor that spins a plastic mount to create a constant percussion noise, while the other side is where things get a lot more interesting. The end result is a low to high tonal sound, but to create it all you simply have to do is create capacitance by touching the small metal wire. To adjust the sound there are multiple ways to do so, within the box you can utilize the pressure buttons to increase or decrease an "offset" variable, while on the outside of the box you can twist the knob of a potentiometer to dim or brighten a white led. This led is mapped to the photosensor on the CPE to create a natively higher sound the brighter the light is or lower if less light is available! I suppose one question I have for anyone curious to give an answer is thus: With the small and rackety motor we have available to us, what is the most pleasing sound you think you can create? Personally, I think it may be glass but didn't have any at my disposal to try, I saw someone else do wood which was interesting, but by and large, the motor's own noise is obnoxious.


And finally the Schematic:


#include <Servo.h>
#include <Adafruit_CircuitPlayground.h>
#include <Adafruit_Circuit_Playground.h>

int speaker = 0;
int leftButton = 4;
int rightButton = 5;
int slideSwitch = 7;
int freq = 500;
int offset = 0;
Servo myServo;
int pos = 0;
int inc = 1;
int timer = 0; 

void setup() {
  // put your setup code here, to run once:
  Serial.begin(9600); // init Serial Monitor
  delay(100); // pause
  CircuitPlayground.begin(); // init CPE
  pinMode(leftButton, INPUT_PULLDOWN); // init left push button
  pinMode(rightButton, INPUT_PULLDOWN); // init right push button
  pinMode(A8, INPUT); //init light sensor
  pinMode(A4, INPUT); //init capitence sensor
  pinMode(speaker, OUTPUT); // init speaker
  myServo.attach(10);
}

void loop() {
 /*Welcome to my little instrument, the way it works is the by touching your finger to the white wire
  * it will play a tone, to change the tone, you can turn the potentiometer to dim or brighten the white
  * LED inside, brighter light equals higher tones, less light lower tones. If you want to manually 
  * adjust the tone to dial into a sound, use the buttons, the left button will decrease the frequency 
  * by 10 on each press, the right button will increase frequency by 10. Create something interesting
  * alongside the thrumming of the servo!
  */
if(digitalRead(leftButton)) {   // if reading the left button returns true
    offset -= 10;   // decrease tone frequency by 10
    delay(500); //wait half sec, this prevent rapid acceleration
  } else if(digitalRead(rightButton)) { // if reading the right button returns true
    offset += 10;   //  increase tone frequency by 10
    delay(500);   //wait half sec, this prevent rapid acceleration
  }
  if (CircuitPlayground.readCap(A4) > 1000){  //If the capacitance is greater than 1000, (This should prevent minor movements from activatinng and should activate only on good contact with finger)
    int light = analogRead(A8); //read the data from photosensor
    freq = map(light, 0, 150, 100, 500); // pair the light values from 0 to 150 to 100hz to 500hz
    CircuitPlayground.playTone(freq+offset, 100); //Play a quick tone equal to freq reading plus offset
  }
  if (millis() > timer + 15) {
    myServo.write(0);
    timer = millis();
  } else if (millis() < timer +15){
    myServo.write(180);
  }

  Serial.print(analogRead(A8));
  Serial.print("\t");
  Serial.println();
}


13 March 2021

Scaffolding NIME Music Box

I do want to formally apologize for not making a music box for I was dealing with personal matters and so forth. I wanted to turn something in and get some results back rather than turn in nothing at all. For the music box I had in mind, I wanted the design to be enclosed in a good sized square box that I could have room to put the breadboard, circuit playground express, and other components inside it. There are three key components that make it all come together. First, the CPE is connected to a 1K resistor with potentiometer that controls the brightness of the blue LED. Second, it is then passing a current to whenever the button is pushed, it turns the servo motor back and forth 90 degrees and makes a distinctively precarious noise. The servo motor would be at the far end of the box in order to create more space for the more complex components. Last, the switch would activate the speaker that will play "Happy birthday" tune whenever it's on. Then, whenever it's off, the music would stop. My question to you is how could I have designed the box in way that would be able to fit, be professional, and meet criteria for this project? I do again want to apologize for not turning in a full project due to personal issues, but would rather turn in something and get some grade rather than nothing at all. 


/* Music Box

    By John Keith

*/


//Libraries

#include <Servo.h>

#include <Adafruit_Circuit_Playground.h>

#include <Adafruit_CircuitPlayground.h>

#define LED 10


Servo myServo; //Create servo object to control servo


//Variables

int neoState = 0;

int bCurrent = 0;

int bPrevious = 0;

int pot = 0;


void setup()

{

  CircuitPlayground.begin(); //Starts up playground

  myServo.attach(A6); // Attaches the servo from A6 on CPE to pin 9 on breadboard

  pinMode (LED, OUTPUT); //Output

  Serial.begin(9600);

  delay(1000);

}


void loop()

{

  if (digitalRead(CPLAY_RIGHTBUTTON)) //makes servo turn 90 degrees back and fourth

  {

    delay(200);

    myServo.write(90);

    delay(200);

    delay(200);

    myServo.write(0);

    delay(200);

  }


  if (digitalRead(CPLAY_SLIDESWITCHPIN)) //If switch turns on, melody plays

    "Happy birthday";

  {

    CircuitPlayground.playTone(700, 200);

    CircuitPlayground.playTone(600, 200);

    CircuitPlayground.playTone(500, 200);

    CircuitPlayground.playTone(600, 200);

    CircuitPlayground.playTone(700, 200);

    CircuitPlayground.playTone(700, 200);

    CircuitPlayground.playTone(700, 200);

    delay(300);

    CircuitPlayground.playTone(600, 200);

    CircuitPlayground.playTone(600, 200);

    CircuitPlayground.playTone(600, 200);

    delay(300);

    CircuitPlayground.playTone(700, 200);

    CircuitPlayground.playTone(1000, 200);

    CircuitPlayground.playTone(1000, 200);

  }


  //Potentiometer control

  pot = analogRead (A4);

  Serial.println (pot);

  pot = map(pot, 1, 1024, 1, 255);

  analogWrite(LED, pot);

}


12 March 2021

Scaffolding: NIME Music Box


This is a music box that plays "Mary Had a Little Lamb", creates a precautionary noise, and has a light

that can dim. There is an open front component that houses the precision servo and a back component

that houses all the electrical parts and wires. Within the back component, there is a Circuit Playground

Express(CPE) and a breadboard that controls and commands the entire box. Connected to the CPE is

the breadboard which houses a 1k resistor that connects to a white LED with a blue potentiometer that

is off to the side. The LED can be seen through a square hole on the top of the back component of the

box. When the potentiometer is turned left and right, it causes the white LED to dim and brighten. A

flathead screwdriver goes through the top of the back of the box and connects to the potentiometer for

the user to move more easily. A servo motor sits in the front open compartment, has a small piece of

wood screwed to its top and is also connected through the breadboard, and is controlled by the CPE.

A button is connected to said servo and when pressed, the servo and its wood piece spin back and

forth 180 degrees to create a precautionary noise. A small plastic rod also goes through the top of the

back component of the box for the user to push more easily. Finally, a speaker on the CPE can play a

short melody with the flip of a switch that is also found on the CPE. Another plastic rod goes through

the top of the back component of the box for the user to move the switch more easily. How could one

decorate this box to look more appealing?


/****************************

Music Light Percussion Box

****************************/

#include <Servo.h>

#include <Adafruit_Circuit_Playground.h>

#include <Adafruit_CircuitPlayground.h>

#define led 10


Servo myservo; //create servo object to control a servo


//Variables

int neoState = 0;

int bCurrent = 0;

int bPrevious = 0;

int pot = 0;


void setup()

{

CircuitPlayground.begin(); //starts up playground

myservo.attach(A6); // attaches the servo from A6 on the CPE to pin 9 on the breadboard

pinMode (led, OUTPUT); //LED output

Serial.begin(9600);

delay(1000);

}


void loop()

{

if (digitalRead(CPLAY_RIGHTBUTTON)) //makes servo turn 180 degrees back and fourth

{

delay(200);

myservo.write(180);

delay(200);

delay(200);

myservo.write(0);

delay(200);

}


if (digitalRead(CPLAY_SLIDESWITCHPIN)) //if switch on, melody plays 
"Marry Had a Little Lamb"

{

CircuitPlayground.playTone(800, 200);

CircuitPlayground.playTone(700, 200);

CircuitPlayground.playTone(600, 200);

CircuitPlayground.playTone(700, 200);

CircuitPlayground.playTone(800, 200);

CircuitPlayground.playTone(800, 200);

CircuitPlayground.playTone(800, 200);

delay(400);

CircuitPlayground.playTone(700, 200);

CircuitPlayground.playTone(700, 200);

CircuitPlayground.playTone(700, 200);

delay(400);

CircuitPlayground.playTone(800, 200);

CircuitPlayground.playTone(1000, 200);

CircuitPlayground.playTone(1000, 200);

}


//Potentiometer control

pot = analogRead (A4);

Serial.println (pot);

pot = map(pot, 1, 1024, 1, 255);

analogWrite(led, pot);

}


11 March 2021

NIME Music Boi


For this project, I needed to create an interactive device using a potentiometer + 2 inputs, and a servo + speaker as outputs.

 First, let’s talk about the buttons. Originally, I was going to have them play a tune alongside the metronome, but it turns out the Circuit Playground can’t really handle that (as soon as it plays a tone, everything else stops). So currently the behavior is such that as soon as you press the button, it plays a tune – and that tune may be modified, depending on where you have the potentiometer set. The tune is played by calling a series of functions, and those functions have values for pitch and duration that can then be modified by the potentiometer. I keep talking about the potentiometer, so let’s look at that.

 The potentiometer basically does 3 things. First, about 1/5th of it does nothing – it turns off the servo, and sets it’s modifying variables to zero. Second, it controls a servo – that servo oscillates back and forth at a faster and faster rate as you crank up the dial (I got it as close to matching the beat of the songs as I could, but the processor doesn’t always process at a consistent rate). Third, it sets the “modifying variables” to certain values that are mapped out to the potentiometer. Essentially, at low values, songs get played lower pitched and at a slower pace – higher values get higher pitched and faster paced.

 It all comes together in such a way that the rhythm of the servo serves as important feedback to the user, letting them know what sort of song they can expect when they push the button. Do you feel this device creates an engaging handheld musical experience? Let me know!

 Here’s the schematic, video, and code:

#include <Adafruit_CircuitPlayground.h> #include <Adafruit_Circuit_Playground.h> #include <Servo.h> /* Music Box Scaffolding * By R Mike Livingston */ Servo myservo; // create servo object to control a servo int potentiometerPin = A1; // analog pin used to connect the potentiometer int analogValue; // variable to read the value from the analog pin int mappedAnalogValue; bool songRainbow = false; bool songAllstar = false; const int beatMod = 5; // Changes how the songs speed interact with analog int durationMultiplier = 0; const int mediumSpeed = 750; // Changes how the songs pitch interact with analog int speedPitchMod = 0; int servoAngle = 90; // variable to store the servo position bool angleRise = true; void setup() { Serial.begin(9600); CircuitPlayground.begin(); myservo.attach(A2); CircuitPlayground.playTone(300,50); CircuitPlayground.playTone(500,50); CircuitPlayground.playTone(700,70); } void loop() { //..............................................................................Potentionmeter read analogValue = analogRead(potentiometerPin); //Read user value from potentiometer //..............................................................................Button Press Detection if (CircuitPlayground.leftButton() == true && songRainbow == false) { songRainbow = true; songAllstar = false; //reset other song } if (CircuitPlayground.rightButton() == true && songAllstar == false) { songAllstar = true; songRainbow = false; //reset other song } //...............................................................................Play Song if (analogValue <= 300) //in off state, songs play "normally" (no speed/pitch change) { speedPitchMod = 0; durationMultiplier = 34; } else { speedPitchMod = analogValue - mediumSpeed; //calculate and then map tone modulation values speedPitchMod = map(speedPitchMod, -mediumSpeed, 1023 - mediumSpeed, -60, 80); durationMultiplier = map(analogValue, 0, 1023, 100, 10); // map tone durations based on analog input } durationMultiplier *= beatMod; //multiplied by a const value in the variales so I can easily find the "sweet spot" in testing. PlaySong(); //...............................................................................Servo Drum if (analogValue > 300) // analog off range { RunDrum(); } //...............................................................................Console/Serial Printer ConsolePrint(); } //============================================================================================= CONSOLE PRINT void ConsolePrint() { Serial.print("Analog Value:"); Serial.print(analogValue); Serial.print(" Servo Angle:"); Serial.print(servoAngle); Serial.print(" Angle Rising?"); Serial.print(angleRise); Serial.print(" Duration Multiplier"); Serial.print(durationMultiplier); Serial.println("---"); } //============================================================================================= PLAY SONG void PlaySong() { //.............................................................................Over the Rainbow // 4C 4c 2b 1g 1a 2b c2 4C 4a 8g 4A 4f 2e 1C 1D 2e 2f 2d 1B 1C 2D 2e 4C .... Duration/Notes // 1 5 9 11 12 13 15 17 21 if(songRainbow == true) { NoteC4(4); NoteC5(4); NoteB4(2); NoteG4(1); NoteA4(1); NoteB4(2); NoteC5(2); songRainbow = false; } //.............................................................................All Star // .... Duration/Notes // if(songAllstar == true) { NoteG4(2); NoteD5(1); NoteB4(1); NoteB4(2); NoteA4(1); NoteG4(1); NoteG4(1); NoteC5(2); NoteB4(1); NoteB4(1); NoteA4(1); NoteA4(1); NoteG4(1); songAllstar = false; } } //============================================================================================= RUN DRUM void RunDrum() { if (servoAngle <= 70) //direction change variable control { angleRise = true; myservo.write(servoAngle); // move motor } if (servoAngle >= 110) { angleRise = false; myservo.write(servoAngle); // move motor } if (angleRise == true) //increment angle variable { servoAngle = servoAngle + 1; } if (angleRise == false) { servoAngle = servoAngle - 1; } //myservo.write(servoAngle); // move motor DelayFromAnalog(); } //============================================================================================= DELAY FROM ANALOG void DelayFromAnalog() { // wait an ammount of time based on analog mappedAnalogValue = map(analogValue, 300, 1023, 20, 1); delay(mappedAnalogValue); } //============================================================================================= NOTE(x)(y) //...............................................................................Individual Notes void NoteA3(int duration) { CircuitPlayground.playTone(220 + speedPitchMod,duration * durationMultiplier); } void NoteB3(int duration) { CircuitPlayground.playTone(247 + speedPitchMod,duration * durationMultiplier); } void NoteC4(int duration) { CircuitPlayground.playTone(262 + speedPitchMod,duration * durationMultiplier); } void NoteD4(int duration) { CircuitPlayground.playTone(294 + speedPitchMod,duration * durationMultiplier); } void NoteE4(int duration) { CircuitPlayground.playTone(330 + speedPitchMod,duration * durationMultiplier); } void NoteF4(int duration) { CircuitPlayground.playTone(349 + speedPitchMod,duration * durationMultiplier); } void NoteG4(int duration) { CircuitPlayground.playTone(392 + speedPitchMod,duration * durationMultiplier); } void NoteA4(int duration) { CircuitPlayground.playTone(440 + speedPitchMod,duration * durationMultiplier); } void NoteB4(int duration) { CircuitPlayground.playTone(494 + speedPitchMod,duration * durationMultiplier); } void NoteC5(int duration) { CircuitPlayground.playTone(523 + speedPitchMod,duration * durationMultiplier); } void NoteD5(int duration) { CircuitPlayground.playTone(587 + speedPitchMod,duration * durationMultiplier); } void NoteE5(int duration) { CircuitPlayground.playTone(659 + speedPitchMod,duration * durationMultiplier); }

 NIME Music Box

David Perez


My NIME music box device is very akin to a synthesizer. The device at all times is creating beeps and rotating its servo and it's up to the user to manipulate the way it sounds and how fast is plays. The music box is housed in a small rectangular box suitable for most hands to comfortably grip and reach all the controls. Users can input to the device using the two push buttons on the Circuit Playground Express, the slide switch on the CPE, the potentiometer dial on the box or by moving the box around to input motion.

Input/Output

Across the Circuit the LEDs are active. The LEDs by the corners (0, 5, 6 and 9) are lit green, LEDs 1 and 8 are red and LEDs 3, 4, 7 and 8 are blue. These are the default states of these LEDs.

The left push button adds 2 beats to the tempo while held down and changes LED 1 to blue to provide feedback.

The right push button adds 1 beat to the tempo while held down and changes LED 8 to blue to provide feedback.

When both push buttons are held, all beats are added together.

When the slide switch is in the + position, the tempo's rate increases and the Green LEDs become yellow to emphasize the new speed.

When the user shakes the music box, the CPE detects the motion and calculates a multiplier to the sound. The blue LEDs will become yellow when motion is detected (or white if much motion is detected). The stark change in color helps the user to understand their motion is detected.

When the potentiometer is twisted left, the sound is manipulated on a base level. The values of the potentiometer are greater than what motion can achieve, but the two are multiplied together. This can be used to raise the base value, then shake the device and achieve higher than normal sounds.

Would the device be easier to control or understand if the slide switch and buttons were external? That is, if the buttons were attached to the box as opposed to the circuit itself?

Video Demo

Schematic

Code

#include <Adafruit_CircuitPlayground.h>
#include <Adafruit_Circuit_Playground.h>
#include <Servo.h>


// initilization

// Servo
Servo myservo;
int pos = 0; // actual Servo position
int dir; // represents the condition the servo is in with 0 or 1

int rate = 500; // set base tempo
int potpin = A6; // potentiometer

// Sound data
int pitch; // adds pitch via potentiometer
int motion = 0; // contains the level of motion generated by the user
int sound; // end result sound after all inputs are calcuated


void setup() {
  CircuitPlayground.begin();
  myservo.attach(3);
  CircuitPlayground.setPixelColor(0, 0, 20, 0);
  CircuitPlayground.setPixelColor(9, 0, 20, 0);
  CircuitPlayground.setPixelColor(4, 0, 20, 0);
  CircuitPlayground.setPixelColor(5, 0, 20, 0);
}

// main loop below
void loop() {

  pitch = analogRead(potpin); // read poteniometer input
  pitch = map(pitch, 0, 1023, 0, 60); // map input to pitch scaling from 0 to 60
  motion = motionMulti(motion); // call function that gets multiplier of motion
  sound = pitch * motion; // Final calculation of sound, motion times pitch

  // base tempo, plays with no input. Base tempo = 7 + sound
  CircuitPlayground.playTone((7 + sound), rate);

  if (CircuitPlayground.slideSwitch()) {
    rate = 200; // change tempo to 200 when slide-switch is +, change LEDs to yellow
    CircuitPlayground.setPixelColor(0, 20, 20, 0);
    CircuitPlayground.setPixelColor(9, 20, 20, 0);
    CircuitPlayground.setPixelColor(4, 20, 20, 0);
    CircuitPlayground.setPixelColor(5, 20, 20, 0);
  }
  else {
    rate = 500; // return tempo to 500, return LEDs to green
    CircuitPlayground.setPixelColor(0, 0, 20, 0);
    CircuitPlayground.setPixelColor(9, 0, 20, 0);
    CircuitPlayground.setPixelColor(4, 0, 20, 0);
    CircuitPlayground.setPixelColor(5, 0, 20, 0);
  }

  if (CircuitPlayground.leftButton()) // Left button held down produces 2 sounds
  {
    CircuitPlayground.setPixelColor(1, 0, 0, 20); // make LED 1 blue
    CircuitPlayground.playTone((58 + sound), 100); // base sound 58 + sound
    CircuitPlayground.playTone((31 + sound), 100); // base sound 31 + sound
  }
  else CircuitPlayground.setPixelColor(1, 20, 0, 0); // return LED 1 to red

  // Right button held down produces one new sound.
  if (CircuitPlayground.rightButton()) {
    CircuitPlayground.playTone((25 + sound), 100); // Base sound is 25 + sound
    CircuitPlayground.setPixelColor(8, 0, 0, 20); // make LED 8 blue
  }
  else CircuitPlayground.setPixelColor(8, 20, 0, 0); // return LED 8 to red

  runServo(); // Call runServo
}

// this function captures motion and creates a value that acts as a multiplier for the pitch
int motionMulti (int)
{
  float movementX, movementY, movementZ, movement;

  movementX = abs(CircuitPlayground.motionX());  // read the X motion (absolute value)
  movementY = abs(CircuitPlayground.motionY());  // read the Y motion (absolute value)
  movementZ = abs(CircuitPlayground.motionZ());  // read the Z motion (absolute value)
  movement = movementX + movementY + movementZ;  // aggregate the movement sensed

  movement = map(movement, 8.0, 60.0, 3.0, 12.0); // times 3 to times 13 multiplier

  // LEDs 2, 3, 6 and 7 are default blue, turn yellow to white when motion is detected
  CircuitPlayground.setPixelColor(2, (3 * movement), (3 * movement), (18 - movement));
  CircuitPlayground.setPixelColor(3, (3 * movement), (3 * movement), (18 - movement));
  CircuitPlayground.setPixelColor(6, (3 * movement), (3 * movement), (18 - movement));
  CircuitPlayground.setPixelColor(7, (3 * movement), (3 * movement), (18 - movement));
  return movement;
}


// This function handles the servo's position on each loop.
void runServo ()
{

  if (dir == 0) // when in position 0, move to position 1
  {
    pos += 120;
    myservo.write(pos);
  }
  if (dir == 1) // when in position 1, move to position 0
  {
    pos -= 120;
    myservo.write(pos);
  }

  if (pos <= 120) dir = 1; // if Servo has moved to position 1, change "dir" to 1
  if (pos <= 0) dir = 0; // if Servo has moved to position 0, change "dir" to 0
}


05 February 2021

Unconventional Switch: Page Light

The switch I created lights up a blue LED when two pages of a book meet or the book is closed. The paper within the book is not conductive within itself so I taped one wire to a single page and fashioned an alligator clip to another end. Ideally, I would have used two alligator clips but in this demonstration I used what was available. The battery supply is a 9V batter connected to a power supply module. I only had a 220Ohm resistor on hand so the resistance is questionable. As mentioned in the video I can see possible implications of the switch being used for sick bookmarks and potentially study reminders. Video is embedded but I can upload to Youtube as well if that doesn't work.